The Fractal Continuum (Hard) Dungeon Guide (FFXIV Stormblood) – Boss Mechanics & Strategy
Duty Information
Expansion: Stormblood
Encounter: The Fractal Continuum (Hardt)
Players: 4 Players (1 Tank, 1 Healer, 2 DPS)
Duty Finder Type: Dungeon
Level: 70
Unlock Requirement: An Unwanted Truth
Common Failure Points
- Stepping into a Allagan Gravity puddle during the Motherbit encounter, detonating it and inflicting a 40-second Heavy debuff at the worst possible moment.
- Crossing the brown line during Motherbit’s Citadel Buster charge, taking a massive knockback and the full charged attack simultaneously.
- Failing to stack with the correct partner during the Ultima Warrior’s Sophia phase, allowing both the Reduced Immunity and Bleeding debuffs to apply.
- Moving to the wrong meteor during Ultima Warrior’s Zurvan phase and taking Infinite Anguish instead of cleansing the assigned elemental debuff.
- Misreading the Ultima Beast’s animation for Death Spin versus Aether Bend and moving in the wrong direction for an untelegraphed point-blank or donut AoE.


Dungeon Overview
The Fractal Continuum (Hard) is a level 70 dungeon introduced in Patch 4.2 with Stormblood. It revisits the setting of the original Fractal Continuum from Heavensward with significantly escalated mechanical demands, presenting three boss encounters that draw on Allagan technology and the Warring Triad to build some of the most mechanically layered encounters in Stormblood’s optional dungeon tier. The dungeon has no Duty Support and functions as a genuine end-of-expansion challenge for groups seeking something more demanding than the main scenario dungeons.
Motherbit opens the run with a fight built around the interaction between add patterns and a half-arena charged attack, requiring the party to read the add formation and cross to the safe half before a brown boundary line locks the arena permanently. The Ultima Warrior is the dungeon’s most complex encounter — a primal absorption fight in which the boss cycles through mechanics borrowed from Sephirot, Sophia, and Zurvan, each requiring distinct party responses that must be executed cleanly under simultaneous pressure from the boss’s own rotation. The Ultima Beast closes the dungeon with two alternating untelegraphed AoEs readable only by animation and battle log, combined with a proximity mechanic, spreading AoE clusters, and a hard enrage at ten percent HP.
The Fractal Continuum (Hard) is one of the most mechanically demanding optional dungeons in Stormblood and rewards groups that take the time to understand each boss’s full ability set before pulling. Several mechanics — Citadel Buster’s irreversible commitment point, the Sophia paired ring stack, the Zurvan elemental assignment, and the Ultima Beast’s animation-read AoEs — have consequences severe enough that encountering them blind is a reliable wipe source. This dungeon benefits significantly from a full briefing before each boss. Need the unlock path? See All FFXIV Dungeon Unlock Requirements.
Dungeon Objectives
- Arrive at the Reality Augmentation Bay
- Defeat Motherbit
- Arrive at Exhibit Level VIII
- Defeat the Ultima Warrior
- Arrive at the Genesis Engine
- Defeat the Ultima Beast
Boss Encounters
Motherbit
Key Mechanics
- Electrochemical Transfer — The dormant add units reactivate and move into a new pattern. Adds cannot be targeted or damaged during repositioning. Two pattern types exist: Odd patterns have some adds targeting random players with line AoEs while others deal repeated damage to the tank; Even patterns have the adds form a horizontal or vertical line splitting the arena in half, which is always paired with Citadel Buster.
- Allagan Gravity — Targets a random player with a large circle AoE that leaves a persistent black puddle at the detonation point. Any player who steps in the puddle causes it to explode for high damage and inflicts 40 seconds of Heavy, after which the puddle disperses. Healers should be ready to cleanse the Heavy debuff if a puddle is accidentally detonated.
- Citadel Buster — The boss and adds connect with an orange tether and turn to face the same direction, then charge a massive attack covering one half of the arena. During Even patterns, the adds form a line first — move to the arena centre, then watch which direction the add line faces to identify the safe half. Halfway through the cast, the ground beneath the adds turns into a brown line that deals moderate damage, applies a 60-second Vulnerability Up stack, and causes a massive directional knockback to any player who touches or crosses it. Once the brown line appears, crossing is effectively impossible. The attack also inflicts 20 seconds of uncleansable Damage Down on anyone hit.
Strategy Notes
Motherbit is an encounter built around one high-commitment mechanic and a straightforward add pattern system that feeds into it. The base rotation is manageable — Allagan Gravity places black puddles that the party must simply avoid touching, and the Odd pattern add activations produce line AoEs and tank hits that reward positional awareness rather than demanding complex responses. The fight’s defining challenge is Citadel Buster, which requires the party to commit to the safe half of the arena before a boundary line appears and makes the wrong side permanently inaccessible.
When an Even pattern Electrochemical Transfer fires, the adds form a horizontal or vertical line across the arena. The party should move toward the centre of the arena immediately — not the edge, and not the tank’s current position — and watch which direction the boss and adds orient toward as the Citadel Buster tether forms. The tether connects the boss and adds in the direction of the attack; the safe half is behind the orientation. Move to the safe half decisively and hold position there. The window to cross is the time between the tether forming and the brown boundary line appearing, which is approximately half the cast duration. A party that is already near the centre when the orientation is revealed has the most flexibility; a party that is at the far edge of the unsafe half will need to move immediately without hesitation.
Once the brown line appears, treat it as an absolute wall. Any player still on the wrong side of the line when it activates will take the knockback into the charged attack — the damage from both combined, plus the 20-second uncleansable Damage Down, is potentially lethal and will leave the affected player severely debuffed for the remainder of the fight. Do not attempt to sprint through after the line appears. If a player misses the window, the healer should burst-heal them through the charged attack hit rather than risking the line crossing.
Allagan Gravity puddles persist across the fight and accumulate if multiple casts land in poor locations. Players who receive the circle AoE should move to an edge or corner area and allow the puddle to drop in a low-traffic zone. A puddle placed in the centre of the arena or near the area the party needs to be in for the next Citadel Buster read will be detonated accidentally during repositioning. The Heavy debuff from detonation lasts 40 seconds — long enough to severely compromise a player’s ability to respond to the next Citadel Buster safely. Healers should prioritise cleansing it immediately if it applies.
Failure Points
Citadel Buster deaths from the brown line almost always come from one of two causes: a player who was at the far arena edge when the Even pattern activated and could not reach the centre in time to read and respond to the boss’s orientation, or a player who correctly identified the safe half but waited too long to commit and began crossing after the line appeared. Both are correctable with earlier pre-positioning. When an Even pattern Electrochemical Transfer fires, the correct immediate response is to move toward the centre regardless of the party’s current position — do not wait to see the orientation before moving inward.
The uncleansable Damage Down debuff from a Citadel Buster hit compounds the fight’s difficulty significantly. A player with Damage Down contributes reduced output for 20 seconds — long enough to affect the next Electrochemical Transfer cycle — and the debuff cannot be removed by the healer. Prevention is the only solution. Groups that take repeated Citadel Buster hits will find their DPS budget eroded and the fight lengthened, which increases the probability of subsequent Allagan Gravity puddle detonations as the arena becomes progressively more cluttered.
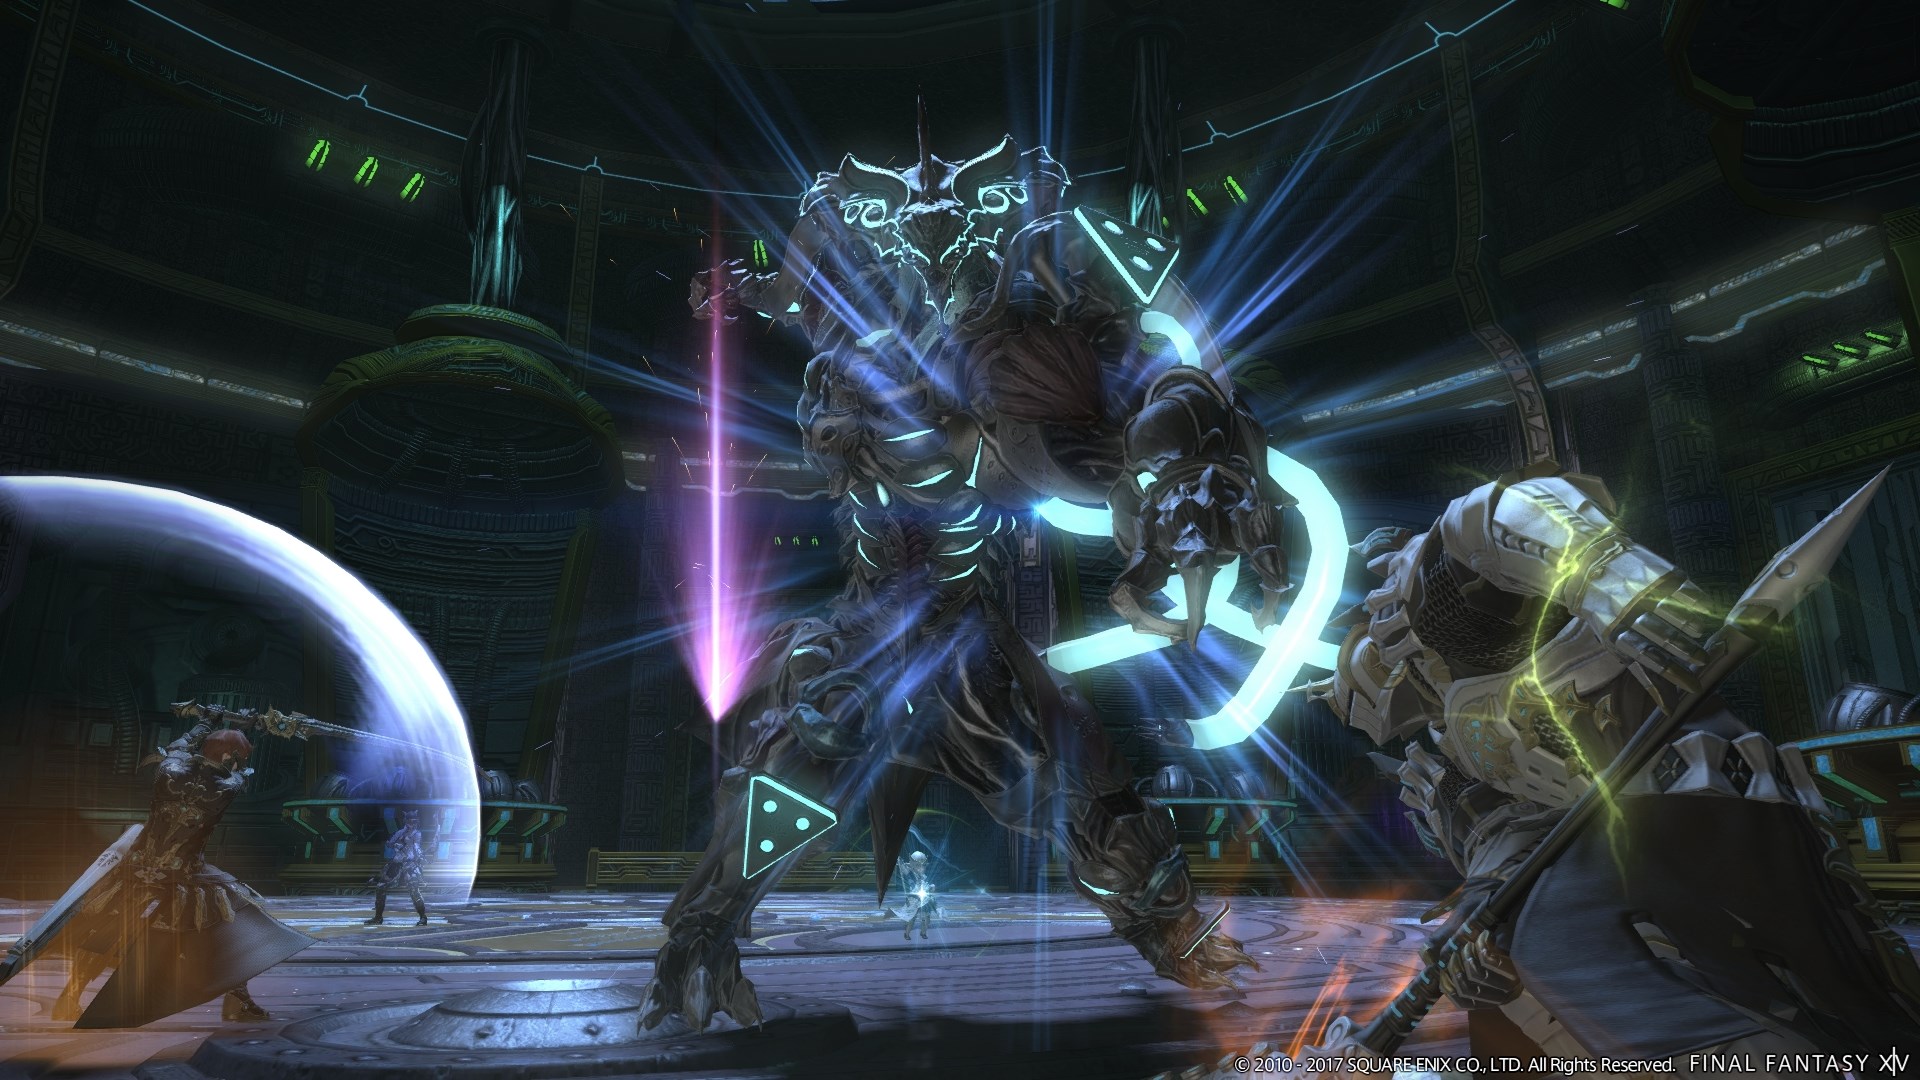
The Ultima Warrior
Key Mechanics
- Aetheroplasm — AoE tankbuster. Non-tank players must move away from the tank when this fires.
- Citadel Buster — Untelegraphed line AoE targeted at a random player, inflicting a 60-second Vulnerability Up stack. Watch the boss’s facing direction and dodge to the side.
- Ceruleum Vent — Raidwide damage with a large knockback. Position to avoid being knocked into arena hazards.
- Mass Aetheroplasm — Stack marker on a random player. The full party stacks to share the damage.
- Primordial Aether — The boss tethers to one of three green primal projections visible outside the arena, absorbs it, and gains access to that primal’s mechanics. An NPC announcement identifies which primal is being absorbed. Each projection can only be absorbed once. The three primal phases are:
- Sephirot — All players receive green AoE markers (Ratzon) that place expanding green orbs at their positions when they detonate. Touching an orb deals repeated light damage and applies a 60-second Vulnerability Up stack. Place markers at the arena edge, spacing them apart to maximise remaining safe area. The boss uses Citadel Buster twice during this phase.
- Sophia — Two players receive a shrinking black ring marker and two receive a shrinking white ring marker. Each black-marked player must stack with a white-marked player before both rings finish shrinking to cancel out the effects. Success displays “Equilibrium between sin and punishment maintained.” Failure applies 20-second Reduced Immunity to the black-ringed player and 20-second Bleeding to the white-ringed player. This occurs twice, targeting the remaining two players the second time. The boss uses Ceruleum Vent followed by Citadel Buster twice during this phase.
- Zurvan — Two players receive Infinite Fire and two receive Infinite Ice. A fire meteor (Southern Star) and an ice meteor (Northern Star) descend slowly on opposite sides of the arena. Each player must stand under the meteor matching their debuff to cleanse it, displaying “The seal is broken! Infinity fades…” Failing to stand under the correct meteor inflicts 12-second Infinite Anguish. An unsoaked meteor explodes for moderate raidwide damage and applies a 60-second Vulnerability Up stack to all players. The boss uses Ceruleum Vent during this phase.
Strategy Notes
The Ultima Warrior is the dungeon’s centrepiece encounter and its most mechanically demanding fight. The base rotation — Aetheroplasm tankbuster requiring non-tank spread, untelegraphed Citadel Buster line AoEs requiring lateral dodges, Ceruleum Vent knockbacks, and Mass Aetheroplasm stack markers — must be managed continuously throughout the fight, including during all three primal phases. Neither the base rotation nor the primal mechanics pause for each other. Groups that treat the primal phases as separate interludes rather than mechanic overlays will be repeatedly surprised by Citadel Buster and Ceruleum Vent firing mid-phase.
The Sephirot phase demands disciplined marker placement. Each player’s green AoE marker expands into a persistent orb after it detonates — an orb placed in the centre of the arena will consume usable safe space for the rest of the phase, and the Vulnerability Up stack from contact lasts 60 seconds. When Ratzon markers appear, all four players should move toward the arena edge and spread laterally to ensure the orbs drop in separate sections of the perimeter, leaving the interior clear. Do not stack the markers together at a single edge point — two overlapping orbs consume double the perimeter space. With the orbs placed cleanly at four separate edge positions, the central arena remains navigable for the two Citadel Buster casts that follow during this phase.
The Sophia phase requires paired stacking between matching ring types. Each black-marked player must find and stack with one of the white-marked players before both rings finish shrinking. The two pairs should communicate their pairings before the rings expire — the default convention is for each black-marked player to move toward the nearest white-marked player, but any consistent assignment works as long as each black marker ends up stacked with a white. The mechanic fires twice: after the first resolution, the remaining two unmarked players will receive the opposite-coloured rings in the second cast. Groups that establish a pairing method before the phase and execute it consistently will find the Sophia phase one of the cleaner moments in the fight; groups that move randomly and hope for proximity pairings will regularly fail one or both resolutions and carry debuffs into the subsequent Citadel Buster casts.
The Zurvan phase assigns fire and ice debuffs to two players each, then sends one fire meteor and one ice meteor descending from opposite sides of the arena. The mechanic is binary: stand under the meteor that matches your debuff. Fire players move to the Southern Star; ice players move to the Northern Star. Each meteor requires at least one player to soak it or it explodes for raidwide damage and a full-party Vulnerability Up stack. With two fire and two ice assignments and two meteors, the pairing is natural — both fire players under the fire meteor, both ice players under the ice meteor. The only complication is a Ceruleum Vent knockback that fires during the meteor descent, which can displace players and must be anticipated in the positioning choice. Stand with some buffer from the arena edge in the direction the knockback will push to avoid being launched out of the meteor soak zone.
Failure Points
Sophia ring failures cause the most persistent debuff accumulation in this encounter. A failed resolution — where black and white rings do not stack before shrinking — applies Reduced Immunity to one player and Bleeding to another simultaneously. Both debuffs last 20 seconds and overlap with the Ceruleum Vent and Citadel Buster casts that follow immediately after the Sophia phase. A player with Reduced Immunity taking a Citadel Buster Vulnerability Up stack while Bleeding is active is in a genuinely dangerous state. Pairs must be established and committed to before the rings begin shrinking — last-second scrambling will fail the resolution as often as it succeeds.
Zurvan meteor failures are the phase’s wipe risk. An unsoaked meteor hitting the full party with Vulnerability Up stacks while the fight is already in a debuff-heavy state from Sophia or Sephirot can quickly become unrecoverable. The elemental debuff assignment is communicated clearly — fire goes to the fire meteor, ice goes to the ice meteor — and the only failure mode is a player who moves to the wrong side out of confusion or spatial disorientation after a Ceruleum Vent knockback. Establish the fire south, ice north convention as a party default before the fight begins and return to correct positions immediately after any knockback displacement.
The Ultima Beast
Key Mechanics
- Death Spin / Aether Bend (no cast bar, alternating) — The boss randomly selects between two untelegraphed AoEs announced by “The Ultima Beast is gathering aetherial energy…” in the battle log. Death Spin is a point-blank AoE hitting anyone in melee range — move away from the boss. Its animation is the boss raising its right claw high in the air. Aether Bend is a donut AoE hitting anyone outside the boss’s hitbox — move inside the hitbox. Its animation is the boss rearing upright on its hind legs. The fight opens with Death Spin followed by Aether Bend. Subsequent uses inflict a 60-second Vulnerability Up stack on anyone hit.
- Flare Star — Spawns a fireball near the arena edge with a proximity marker beneath it, leaving a large magma puddle on detonation. The puddle inflicts Burns while standing in it. Subsequent Flare Star casts replace the previous puddle.
- Allagan Gravity — Targets all players simultaneously with black AoE markers for high damage. Cannot be avoided by spread — heal through.
- Light Pillar — Targets a random player with a small circle AoE, surrounded by eight outward-pointing circles. All nine AoEs fire quickly, then the eight surrounding circles travel outward rapidly in their respective directions. Each hit deals light damage.
- Forborn Beast — Grants the boss a permanent Damage Up buff. Output escalates from this point forward.
- Allagan Flare — Proximity raidwide marker placed on the tank. The tank should move away from the party to reduce damage to nearby players.
- Demi Ultima — High raidwide damage. Healers prepare for a burst heal response.
- Demi Ultima (enrage) — Once the boss drops below 10% HP, it begins a long Demi Ultima cast. The party must kill the boss before the cast completes or the party wipes.
Strategy Notes
The Ultima Beast is a fight that front-loads its most unusual demand: two alternating untelegraphed AoEs that require the party to read either the boss’s animation or the battle log rather than any floor telegraph. The fight opens with Death Spin followed by Aether Bend in fixed order, which gives every player two guaranteed reads of each animation before the random selection begins. Use the opening sequence to calibrate both visual cues. Death Spin’s raised-right-claw animation and Aether Bend’s rearing-upright animation are distinct when anticipated but can blur together under combat pressure if they have not been consciously registered during the opening fixed sequence.
After the first two fixed uses, Death Spin and Aether Bend alternate randomly and each hit applies a 60-second Vulnerability Up stack. The battle log entry “The Ultima Beast is gathering aetherial energy…” precedes both and provides no directional information — the only differentiators are the animation and the boss’s body position. A player who misreads the animation and moves in the wrong direction takes the Vulnerability Up stack and enters the next mechanic window debuffed. Stacking multiple Vulnerability Up stacks from repeated misreads across the fight’s duration compounds the healer’s workload significantly, particularly after Forborn Beast activates the permanent Damage Up buff and all incoming damage increases.
Flare Star places a proximity marker beneath a fireball at the arena edge — move away from the fireball’s spawn point to reduce damage taken. The magma puddle it leaves behind applies Burns to any player standing in it. Subsequent Flare Star casts replace the previous puddle rather than accumulating, so the puddle’s position in the arena changes with each new cast. Track the current puddle location and route movement accordingly. The puddle does not cover a large portion of the arena, but it tends to appear in locations the party is already using for other mechanics, so awareness of its position should be maintained as a background task.
Light Pillar fires a centre AoE with eight outward-tracking AoEs that travel rapidly from the targeted player’s position. The targeted player should move away from the party slightly to ensure the outward AoEs travel into open space rather than through clustered allies. The AoEs move quickly after the initial telegraph fires, so the separation does not need to be large — a few steps away from the nearest party member before the initial circle detonates is sufficient. After Forborn Beast activates, the Damage Up buff increases the pressure from every subsequent mechanic. The healer should treat post-Forborn Beast Demi Ultima casts as high-priority burst-heal moments rather than standard raid damage.
At ten percent HP, the enrage Demi Ultima begins its long cast and must be outpaced entirely. Every damage cooldown that has not been used should be deployed immediately when the cast bar appears. The party’s damage output to this point in the fight — including whether Vulnerability Up stacks from Death Spin or Aether Bend misreads have been accumulating — directly determines whether the enrage is beaten comfortably or missed narrowly. Groups that have played cleanly through the earlier mechanics will reach ten percent with full cooldown availability; groups that have taken repeated Vulnerability Up stacks will have burned more healer GCDs and tank cooldowns that could otherwise have accelerated the kill.
Failure Points
Death Spin and Aether Bend misreads are the fight’s most consistent DPS and survivability tax. Neither hit is lethal in isolation at appropriate item level, but the 60-second Vulnerability Up stack from each miss means a player who misreads two animations in the first half of the fight is carrying the debuff almost continuously into the Forborn Beast phase. The solution is a deliberate moment of attention during the opening two fixed casts — register what each animation looks like before it matters, not while reacting to it. Players who enter the random phase with clear mental anchors for both cues will misread them very rarely.
The enrage at ten percent is the fight’s final accountability check. Groups that managed Death Spin and Aether Bend cleanly, minimised Vulnerability Up stack duration, and kept damage uptime high throughout will find the enrage cast leaves ample time to secure the kill. Groups that accumulated debuffs, burned healer resources through avoidable hits, and lost DPS uptime to repositioning during Flare Star will find the cast bar filling faster than their kill shot arrives. The enrage is not a DPS race in the traditional sense — it is the cumulative consequence of every debuff and mechanic failure that preceded it, resolved in a single final window.
Difficulty Assessment
The Fractal Continuum (Hard) is the most mechanically demanding dungeon in Stormblood’s patch lineup and a genuine end-of-expansion challenge. Its three encounters each introduce mechanics that punish passivity or misreads with long-duration debuffs, uncleansable Damage Down, or wipe-level ultimate attacks — and the Ultima Warrior in particular asks the party to execute three distinct primal-phase mechanics while simultaneously managing the boss’s own untelegraphed line AoE rotation. The dungeon functions less as a casual run and more as a test of the mechanical vocabulary Stormblood’s dungeon tier has been building across its entire run.
- Citadel Buster safe-half commitment timing and Allagan Gravity puddle placement during Motherbit
- Concurrent primal mechanic execution — Sephirot orb placement, Sophia ring pairing, Zurvan elemental assignment — under continuous base rotation pressure during the Ultima Warrior
- Animation-read untelegraphed AoE management and enrage DPS race during the Ultima Beast
- Long-duration debuff awareness — 60-second Vulnerability Up stacks, uncleansable Damage Down — across all three encounters
Groups that brief all three boss encounters in full before pulling and establish clear conventions — Sophia ring pairings, Zurvan elemental assignments, and the Death Spin versus Aether Bend animation anchors — will find the dungeon a satisfying and demanding run that rewards the full depth of the expansion’s dungeon mechanical vocabulary. The Ultima Warrior’s primal phase sequence is one of Stormblood’s most inventive encounter designs, and executing all three phases cleanly in a single run against a boss that continues using Citadel Buster and Ceruleum Vent throughout is genuinely rewarding.
Groups that enter without preparation will find Citadel Buster’s permanent Damage Down debuff and the Sophia failure debuffs stacking into a healing and damage situation that spirals rapidly in the Ultima Warrior encounter, and the Ultima Beast’s animation-read AoEs will generate Vulnerability Up stacks throughout a fight that escalates with a permanent Damage Up buff and an enrage. This is a dungeon where a ten-minute briefing before the first pull produces a fundamentally different run than pulling blind. The mechanics are fair, well-designed, and learnable — they simply do not forgive encountering them for the first time mid-execution.
Previous Dungeon: Hells’ Lid | Next Dungeon: The Swallow’s Compass
Guildmaster Notes
There is something in the Fractal Continuum that the original expedition did not fully account for. They catalogued, they replicated, they stored — and they built something that kept running after the purpose behind it was gone. The hard version of this facility is not a harder version of the same place. It is what the place became when it was left alone with itself long enough to start iterating. The Ultima Warrior and the Ultima Beast are not exhibits. They are conclusions.
The Genesis Engine does not feel like the bottom of a dungeon. It feels like the inside of an argument that Allagan science was having with itself — about what life is for, about what strength means when it is manufactured rather than lived, about whether the difference matters. The Ultima Beast does not answer those questions. It just keeps generating aetherial energy, because that is what it was built to do, and the machinery does not care that no one is left to receive the output.