Hells’ Lid Dungeon Guide (FFXIV Stormblood) – Boss Mechanics & Strategy
Duty Information
Expansion: Stormblood
Encounter: Hells' Lid
Players: 4 Players (1 Tank, 1 Healer, 2 DPS)
Duty Finder Type: Dungeon
Level: 70
Unlock Requirement: An Auspicious Encounter
Common Failure Points
- Standing in the lava trail during Otake-maru’s Grrraaarrrgh chase phase instead of keeping clear of the kiting path.
- Missing the “The wind begins to howl!” or “The wind shifts!” text cues during Kamaitachi and standing in the wrong zone for the resulting AoE.
- Being hit by Kamaitachi’s charge during Whispers in the Wind by standing on or near the fiery lines between whirlwinds.
- Standing on a platform that has arrows pointing into it during Genbu’s Sinister Tide and taking a Vulnerability Up stack at a critical point in the fight.
- Failing to destroy the Chelonian Gate before Genbu’s Focus meter fills during Hell of Waves, maximising the Divine Cataract hit.


Dungeon Overview
Hells’ Lid is a level 70 dungeon introduced in Patch 4.2 with Stormblood. It is an optional dungeon set on a volcanic island of legend in the Ruby Sea — a place where the boundary between the mortal world and something older and stranger has worn thin, and where the creatures that dwell within reflect that quality. The dungeon’s aesthetic is distinctly Hingan in its visual vocabulary but elemental and mythic in character, escalating from the volcanic savagery of the upper areas to the cold, ceremonial grandeur of Genbu’s arena on the island’s summit.
Otake-maru opens the run as a movement-focused fight built around a kiting phase that demands the party keep clear of a lava trail while the boss chases a designated player across the arena. Kamaitachi introduces the dungeon’s most demanding encounter — a fight with two text-cue attacks that require different safe-zone responses, and a Whispers in the Wind phase that fills the arena with moving whirlwinds, explosive clouds, and a charging boss whose hitbox extends significantly beyond the visible charge lines. Genbu closes the dungeon with a platform-reading mechanic and a hard DPS check in which the party must destroy a gate structure before a filling meter triggers a wipe-scaling ultimate.
Hells’ Lid does not have Duty Support and has no previous main scenario context requirement beyond the Stormblood unlock chain. It is one of Stormblood’s more mechanically inventive patch dungeons, with Kamaitachi in particular offering one of the expansion’s most visually chaotic encounters. Groups that understand the charge hitbox warning and the wind-cue safe zones before pulling will find the dungeon a rewarding and well-paced run. Need the unlock path? See All FFXIV Dungeon Unlock Requirements.
Dungeon Objectives
- Arrive at Demonsgate
- Clear Demonsgate
- Arrive in the Furnace
- Clear the Furnace
- Arrive on the Polished Shell
- Defeat Genbu
Boss Encounters
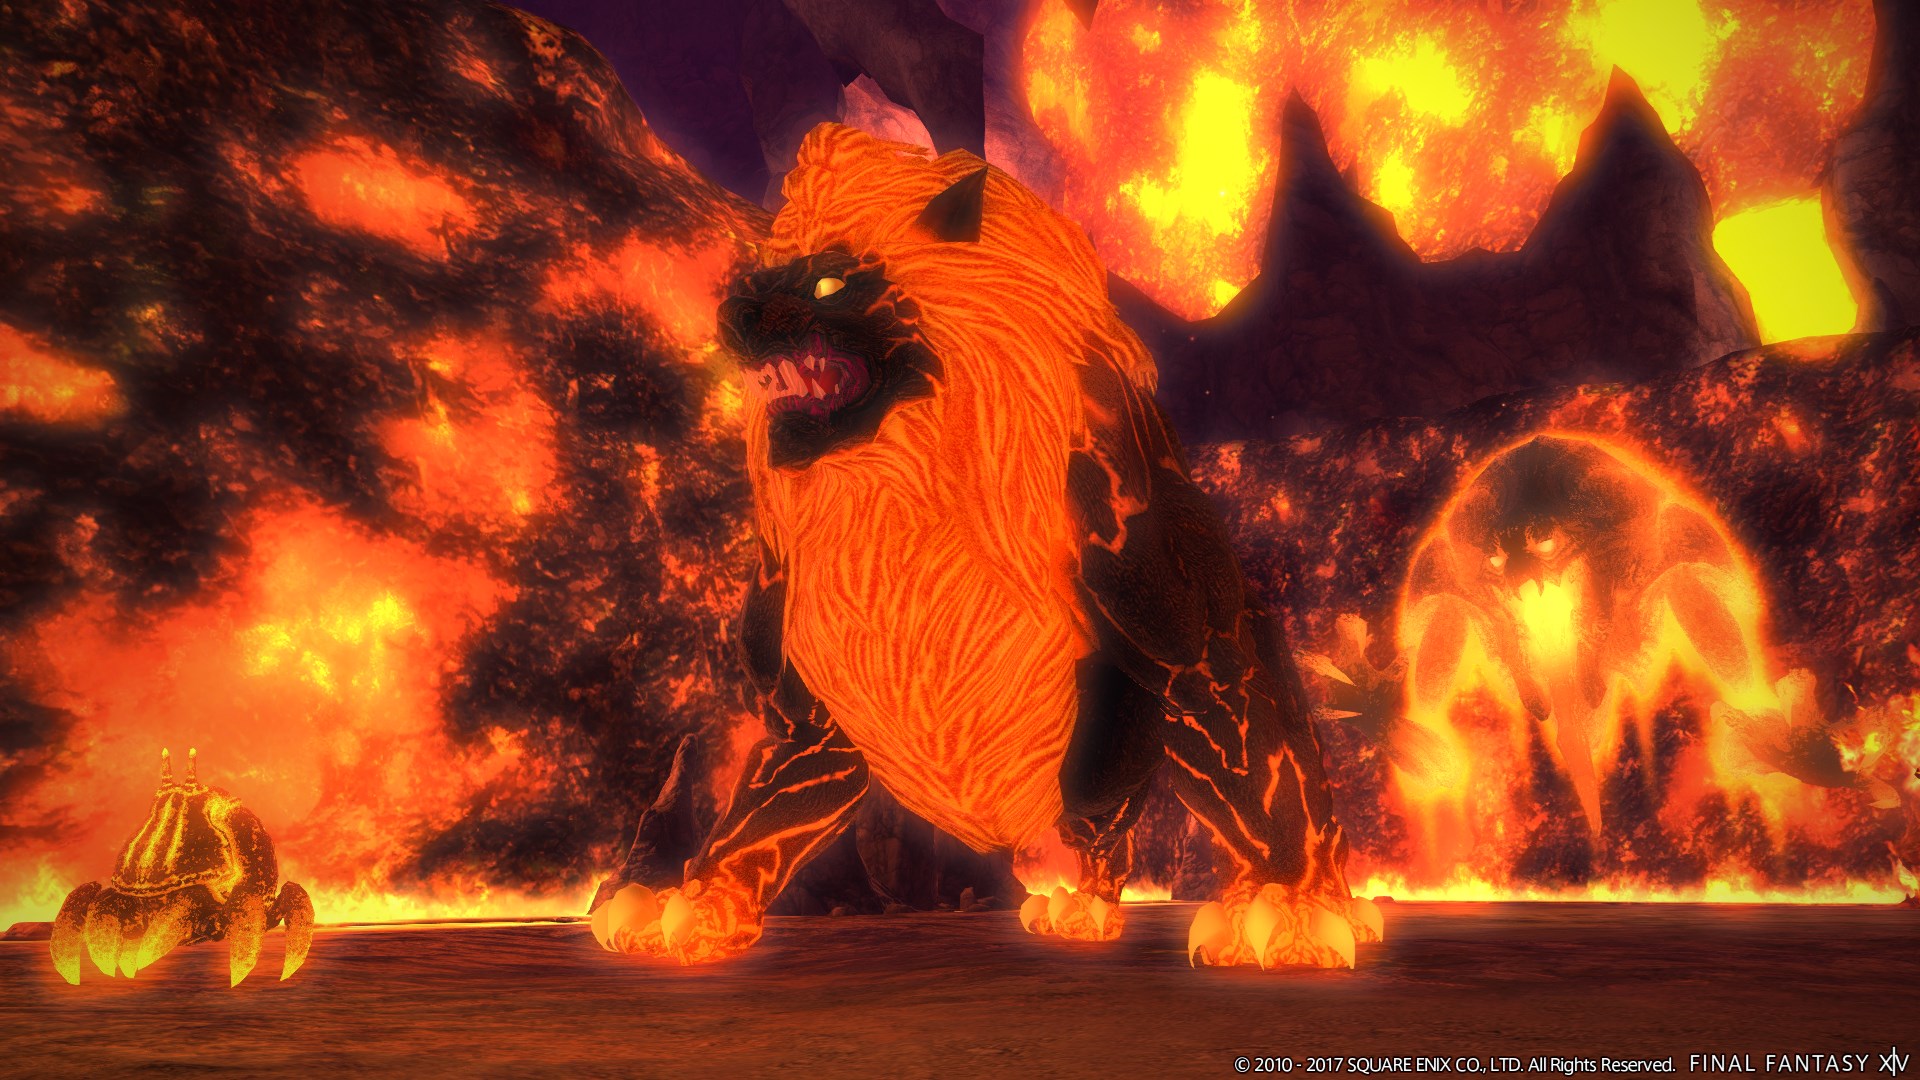
Otake-maru
Key Mechanics
- 100-tonze Swing — Large point-blank AoE centred on Otake-maru. Move away from the boss when this fires.
- 10-tonze Slash — Large cone AoE directed away from the tank. Non-tank players in the cone’s path should move to the sides.
- Grrraaarrrgh — Otake-maru leaps to a non-tank player and begins following them, trailing lava on the ground. The targeted player must kite the boss around the arena. Otake-maru drops his mace and shield during this phase. After some time, he jumps back to his weapons and detonates a short-range point-blank AoE on landing. Players must avoid both the lava trail and the landing AoE.
Strategy Notes
Otake-maru is a fight of two modes: a standard tank-and-spank rotation punctuated by the Grrraaarrrgh kiting phase, and the encounter’s design is clear about what it is testing. The base rotation is uncomplicated — 100-tonze Swing asks melee and the tank to move away promptly when the point-blank telegraph appears, and 10-tonze Slash fires away from the tank, making it primarily a concern for players who are flanking or standing at range behind the boss. Neither demands anything beyond reactive positional awareness, and the fight’s character comes entirely from the kiting phase.
When Grrraaarrrgh fires, Otake-maru leaps to a non-tank player and begins pursuing them directly, drooling lava onto the ground as he moves. The lava trail persists and damages anyone who steps through it. The targeted player’s job is to keep moving — circling the arena perimeter works well — at a consistent pace that keeps Otake-maru following without letting the trail build up in any single area. Moving too slowly allows the lava to pool in a location the rest of the party needs to use; moving too quickly can strand Otake-maru in a position that makes his eventual landing AoE difficult to predict. A steady, deliberate arc around the arena edge is the cleanest kiting path.
The rest of the party should stay well clear of the kiting path during this phase — not clustering behind the kiting player, but also not standing in the interior of the arena where the lava trail may cross. Position in the quadrant of the arena that the kiting player is not currently moving through and track the trail’s coverage to ensure there is a clean path available for the landing phase. When Otake-maru jumps to his dropped weapons, everyone must move away from his landing point before the point-blank AoE detonates. The weapons mark the landing location, so identifying them before the jump gives advance warning of where to avoid.
Failure Points
The lava trail from Grrraaarrrgh is the fight’s primary attrition mechanic. A kiting player who loops back through their own trail — either from moving too quickly and lapping themselves or from panicking and cutting across the arena — builds up lava coverage in central areas that the party then has to navigate around for the remainder of the phase. A steady, outward-arcing path prevents this entirely. The trail does not disappear during the phase, so early placement discipline pays dividends as the kite extends.
The landing AoE at the end of the kiting phase catches players who have not tracked the dropped weapon positions. Otake-maru lands exactly where his mace and shield fell, and the point-blank AoE fires immediately on landing with a short visual wind-up but no meaningful cast bar. Players who are focused on the kiting player rather than the weapon markers will be standing at an unknown risk position when the jump occurs. Keep the weapons in awareness throughout the phase and move away from them as the kite draws toward its natural conclusion.
Kamaitachi
Key Mechanics
- Whipping Wittret (no cast bar) — Tankbuster. No visual indicator beyond the attack resolving. Tank mitigates as available throughout the fight.
- “The wind begins to howl!” (no cast bar) — Text-cue attack. Kamaitachi performs a 360-degree spin, then detonates a large point-blank AoE. The safe zones are either very close to the boss or very far away. Watch for the on-screen message and identify which zone is available based on current arena positioning.
- The Patient Blade — 180-degree AoE covering one half of the arena. Move to the safe half before it resolves.
- “The wind shifts!” (no cast bar) — Text-cue attack. Kamaitachi fires a large line AoE through the arena in front of and behind him. Watch for the on-screen message and move to either side of the boss.
- Whispers in the Wind — Kamaitachi summons four Tsumuji-kaze adds and spawns moving whirlwinds and explosive cloud clusters across the arena. Fiery lines periodically appear between the whirlwinds. Kamaitachi charges along these lines with a significantly larger hitbox than the lines themselves — standing on or near any active line risks being hit for moderate damage and a Vulnerability Up stack. The phase ends with a proximity AoE (Reaper’s Gale) dropped at one arena edge. Kamaitachi immediately follows the phase with The Patient Blade.
Strategy Notes
Kamaitachi is the most demanding encounter in the dungeon and one of the more visually intense fights in Stormblood’s optional tier. Its two text-cue attacks share the same structural convention as Hrodric Poisontongue’s untelegraphed mechanics — no cast bar, no AoE indicator, only an on-screen message that tells the party what is about to fire. Both “The wind begins to howl!” and “The wind shifts!” must be read from the text channel rather than the floor, and their responses are different enough from each other that confusing the two mid-fight is a consistent source of avoidable damage. The 360-degree spin that precedes the howl cue is a useful secondary signal — if Kamaitachi begins turning fully around, a point-blank AoE is coming and the party should immediately decide whether to rush in or run far out based on their current position.
“The wind begins to howl!” produces a large point-blank AoE with two safe zones: directly adjacent to the boss, or at maximum range across the arena. Neither middle-distance position is safe. Players who are already at melee range should commit to staying close; players who are at range should run further out rather than attempting to close to the boss in the cast window. Attempting to run from mid-range to either safe zone during the cast is the riskiest path — commit to the closer option from wherever the party is already standing when the cue appears.
“The wind shifts!” fires a line AoE through the full depth of the arena in the direction Kamaitachi is facing — both in front of and behind him simultaneously. The safe zones are the areas directly to either side of the boss. This is a lateral dodge: move perpendicular to the boss’s facing direction when the cue appears. Melee players who are standing directly in front of or behind the boss when the shift cue fires need to step sideways promptly.
The Whispers in the Wind phase is the encounter’s most demanding segment and the one that benefits most from understanding before the pull. When the phase begins, four Tsumuji-kaze adds spawn and should be grouped and killed together — stack near the tank at the arena edge, focus the adds with AoE damage, and keep moving to avoid the whirlwinds and explosive clouds that drift across the arena. The clouds knock back on contact, which can displace players into whirlwinds or active charge lines, so maintain awareness of their positions even while burning the adds.
The critical detail of the Whispers phase is the charge lines. When fiery lines appear connecting the whirlwinds, Kamaitachi will charge along one of them. His visible hitbox extends significantly beyond the width of the line itself — players who believe they are standing clear of the line because they are outside its visual indicator will still be hit if they are anywhere near it. When lines appear, treat a wide buffer zone around every active line as unsafe and move to an area with no adjacent line coverage. After the adds die and the proximity AoE of Reaper’s Gale drops at one edge, move to the opposite edge and prepare immediately for The Patient Blade, which is the first cast after the phase ends.
Failure Points
The charge hitbox during Whispers in the Wind is the fight’s most counterintuitive danger. Players who are standing just outside the visible line telegraph but still within the actual hitbox radius take hits that feel like bad luck rather than positional errors. The correct mental model is to treat any line as having a wide no-stand zone around it — not a narrow telegraph to step over, but a corridor to stay well clear of. This distinction eliminates the majority of Vulnerability Up stack accumulation in this phase.
The two wind-cue responses cause the most deaths in players encountering the fight without preparation. A player who applies the “howl” response — moving toward the boss — to a “shifts” cast will walk into the line AoE. A player who applies the “shifts” response — moving laterally — to a “howl” cast from mid-range will end up in the AoE’s effective coverage. Both cues require reading the text channel and committing to the correct behaviour for that specific message. If the two keep being confused, establish a simple verbal anchor before the pull: howl means in or out, shift means sideways.
Genbu
Key Mechanics
- Caduceus (no cast bar) — Tankbuster. Telegraphed only by Genbu saying “Water to rend flesh from bone!” Tank applies mitigation on hearing the line.
- Hell of Water — Cross-shaped AoE centred on Genbu. Move to the intercardinal positions to avoid the cross arms.
- Hell of Waste — Marks a random player with an AoE indicator and drops a water bomb at their location. The marked player should move away from the party before the bomb lands. Deals moderate damage.
- Sinister Tide — Genbu leaps into the air. On landing, arrows appear on the hexagonal platform tiles alongside a blue orb. The orb explodes and sends water flowing in the direction the arrows indicate. Players must move to platforms whose arrows do not point into them before the water wave resolves. Being hit deals moderate damage and applies one stack of Vulnerability Up.
- Hell of Waves — Genbu becomes invulnerable and begins filling the Genbu’s Focus meter. The Chelonian Gate structure surrounding him must be destroyed before the meter fills completely. During this phase, platform tiles begin glowing and dealing damage to anyone standing on them — move off glowing platforms immediately. Once the gate is destroyed or the meter fills, Genbu casts Divine Cataract.
- Divine Cataract — Party-wide ultimate attack. Damage scales with how full the Genbu’s Focus meter was when it fires — a destroyed gate before full charge means a survivable hit; a full meter means a wipe-level hit.
Strategy Notes
Genbu is an encounter built around two distinct demands — platform reading during Sinister Tide and DPS urgency during Hell of Waves — with a no-cast-bar tankbuster and standard AoE management between them. The fight’s difficulty is well-distributed across both demands, and neither is forgiving of passive play.
The base rotation establishes the fight’s core positional language before the more complex mechanics arrive. Hell of Water fires a cross-shaped AoE from Genbu’s position — moving to an intercardinal position relative to the boss avoids all four arms cleanly. This is the fight’s default safe positioning between mechanics and should become habitual. Hell of Waste marks a player who simply needs to step away from the party and drop the water bomb in empty space before returning. Caduceus has no cast bar and no visual signal beyond Genbu’s spoken line — tanks must listen for “Water to rend flesh from bone!” and apply a mitigation cooldown immediately on hearing it. The vocal cue gives a short but workable window.
Sinister Tide is the fight’s most demanding reading mechanic. When Genbu lands, arrows appear on the hexagonal platforms and a blue orb begins its expansion. The arrows indicate the direction water will flow from each platform — a platform with arrows pointing into it from the orb’s path will be flooded; a platform whose arrows point away from the flow or that sits outside the wave’s direction is safe. The key is reading the arrows on the platforms around the orb, not just the platform the party is already standing on. Move to a tile whose arrows point away from the incoming water before the orb detonates. Vulnerability Up stacks from being hit by Sinister Tide compound with subsequent hits in the fight, so clean platform selection from the first cast is worth the attention it requires.
When Hell of Waves begins, Genbu becomes completely immune and the Chelonian Gate structure around him activates as the only valid target. Every player must immediately switch to the gate and burn it down before the Genbu’s Focus meter reaches full. Simultaneously, platform tiles begin glowing and dealing damage to anyone standing on them — the party must keep moving off lit platforms while maintaining damage on the gate. This is the fight’s DPS check, and it is not forgiving of players who continue attacking Genbu, hesitate before switching targets, or spend too much time dodging platforms rather than dealing damage. Move off glowing tiles with the minimum displacement necessary and return to DPS on the gate immediately. Once the gate is destroyed, Divine Cataract fires — the damage is proportional to the meter level at the moment the gate died. A gate killed at low meter means a light hit; a gate killed at high meter means a heavy but survivable one. A meter that fills before the gate dies delivers a wipe-level strike.
Failure Points
Sinister Tide deaths almost always come from reading only the platform the party is already standing on rather than tracing the water’s projected path from the orb outward. A platform that has neutral or outward-facing arrows is only safe if the orb’s expansion does not send water into it from an adjacent tile. Trace the full path from the orb rather than evaluating each tile in isolation, and move before the orb detonates rather than after. A Vulnerability Up stack from the first Sinister Tide cast makes every subsequent AoE in the fight more dangerous, and the stacks accumulate if subsequent casts are also misread.
An undamaged or partially damaged Chelonian Gate when the Focus meter fills is the most catastrophic failure state in the encounter and typically results from one of two causes: a player continuing to attack the immune Genbu rather than the gate, or excessive time spent dodging glowing platforms at the expense of DPS uptime on the gate. Both are correctable — the target switch to the gate must happen instantly at the start of Hell of Waves, and platform movement should be minimised to the smallest step off the glowing tile rather than a full repositioning arc. The gate has a finite health pool that four players focusing it will deplete comfortably within the meter window if everyone commits to it immediately.
Difficulty Assessment
Hells’ Lid sits at the upper range of Stormblood’s patch dungeon lineup, with Kamaitachi in particular representing one of the more visually and mechanically dense encounters the expansion offers outside the main scenario dungeons. The text-cue attack convention appearing across two of the three bosses — Kamaitachi’s wind cues and Genbu’s Caduceus line — gives the dungeon a distinctive feel that rewards attentive players while consistently surprising those who are not watching the text channel. The Whispers in the Wind phase and the Hell of Waves DPS check are both genuine pressure moments with meaningful failure consequences.
- Lava trail management and landing AoE awareness during the Otake-maru kiting phase
- Text-cue safe-zone discrimination and charge hitbox avoidance during Kamaitachi
- Arrow-direction platform reading under time pressure during Genbu’s Sinister Tide
- Chelonian Gate DPS focus and glowing-platform mobility during Hell of Waves
Groups that establish the text-cue conventions for both Kamaitachi and Genbu before their respective pulls — and that understand the Whispers in the Wind charge hitbox is wider than it appears — will find the dungeon’s difficulty curve fair and satisfying. Otake-maru is a well-constructed warm-up that introduces kiting discipline without overwhelming stakes, and Genbu’s Sinister Tide rewards the platform-reading habit that careful groups will have been developing since the Shisui of the Violet Tides dungeon. The Hell of Waves DPS check is tight enough to be exciting without being unreasonable for groups of appropriate item level.
Groups that freeroll Kamaitachi without understanding the wind cues will take consistent damage from both text-cue attacks and will find the Whispers in the Wind charge lines compounding that attrition with Vulnerability Up stacks — entering the Reaper’s Gale and Patient Blade sequence in weakened health with debuffs active is a genuine wipe risk. Genbu will similarly punish groups that are slow to switch targets during Hell of Waves, and a full-meter Divine Cataract is not survivable by most groups without exceptional healer output and defensive cooldown coordination. Both failure modes are entirely preventable with a minute of explanation before each pull.
Previous Dungeon: The Drowned City of Skalla | Next Dungeon: The Fractal Continuum (Hard)
Guildmaster Notes
Hells’ Lid does not welcome visitors. It does not need to — the island has its own gravity, its own sense of consequence, and the things that live within it are not performing guardianship. They are simply what happens when something old and elemental is left long enough in a place that shares its nature. Otake-maru was not placed at the gate. He grew there. The distinction matters in ways that are difficult to articulate and impossible to ignore when standing in front of him.
Genbu is the island’s summit made flesh — patient, cold, and absolutely certain that whatever comes up the mountain deserves whatever it finds there. There is no malice in the Divine Cataract. There is only the weight of water from a very great height, and the implication that the mountain was here before any of this started, and will be here after. Walking off the Polished Shell intact is not a conquest. It is an exception that the island has, for reasons of its own, chosen to permit.