Kugane Castle Dungeon Guide (FFXIV Stormblood) – Boss Mechanics & Strategy
Duty Information
Expansion: Stormblood
Encounter: Kugane Castle
Players: 4 Players (1 Tank, 1 Healer, 2 DPS)
Duty Finder Type: Dungeon
Level: 70
Unlock Requirement: King of the Castle
Common Failure Points
- Allowing a tethered bomb to reach its target during Zuiko-maru, then standing in the large detonation AoE when it is killed.
- Ignoring Dojun-maru’s clones and allowing them to complete their casts, triggering heavy partywide damage.
- Failing to pick up enough gold piles during Yojimbo’s Payday phases, allowing Daigoro to fill the duty gauge and maximise the partywide damage hit.
- Neglecting to destroy Dragon’s Head adds during the second Payday phase, allowing their column AoEs to accumulate unchecked.
- Standing in the centre during the first Inoshi-Katcho circle AoE, then failing to move back in before the outer ring fires.


Dungeon Overview
Kugane Castle is a level 70 dungeon introduced in Patch 4.0 with Stormblood. It is an optional dungeon set within the gleaming seat of Hingashi’s political power — a castle that presents a face of elegance and neutrality to the outside world while harbouring the Joi movement within its walls. The dungeon’s aesthetic reflects that duality: lacquered corridors, noh theatre staging, and traditional gardens that become arenas for increasingly dangerous confrontations. Unlike the main scenario dungeons that climax with Zenos and Ala Mhigo, Kugane Castle exists at the same level tier as a side story, and its encounter design has a slightly different character — more theatrical, more surprising, and in Yojimbo’s case, one of the most mechanically distinctive final bosses in Stormblood.
Zuiko-maru opens the run with a bomb-management fight that rewards spatial discipline and kiting awareness. Dojun-maru raises the stakes with clone prioritisation and simultaneous spread markers, introducing the kind of multi-target scanning the second half of the dungeon demands. Yojimbo closes the run with a gold-collection mini-game layered over a conventional boss rotation — a Payday phase structure that ties the party’s collective action directly to the severity of the incoming damage, making individual engagement with the mechanics a genuine party-wide responsibility rather than a personal positioning task.
Kugane Castle has no Duty Support. It is a cleanly paced dungeon across its three encounters, accessible to most groups but with a final boss that benefits significantly from understanding the Payday phase before the pull — the duty gauge interaction is unusual enough that groups encountering it for the first time without context tend to underperform it consistently. Need the unlock path? See All FFXIV Dungeon Unlock Requirements.
Dungeon Objectives
- Arrive at the Keisen Garden
- Defeat Zuiko-maru
- Arrive at the Budokan Training Grounds
- Defeat Dojun-maru
- Arrive at the Noh Theater
- Defeat Yojimbo
Boss Encounters
Zuiko-maru
Key Mechanics
- Frontal Cone — Occasional AoE in front of the boss. Tank sidesteps or rotates the boss away from the party as needed.
- Stack Marker — Shared damage marker on a random player. The full party stacks on the marked player to distribute the hit.
- Kenki Release — Partywide AoE damage. Healers should top up the party before and after this cast.
- Bombs — Up to two bombs spawn and tether to random players, pursuing them across the arena. If a bomb reaches its tethered target it binds them. When a bomb is killed it detonates, leaving a large persistent AoE at its death location. Tethered players should kite their bomb toward one side of the arena so the detonation AoE falls in a predictable, avoidable position.
Strategy Notes
The core skill tested by Zuiko-maru is bomb management — specifically, the spatial discipline to keep the detonation AoEs out of the shared arena space the party needs for the rest of the fight. The bombs themselves are not immediately lethal when they spawn, but their behaviour creates pressure that compounds if the tethered players do not handle them deliberately. Each bomb chases its target continuously, and a bomb that reaches its mark will bind the player in place — an inconvenient and potentially dangerous state during any concurrent mechanic. Tethered players should move promptly to one side of the arena and keep the bomb occupied at the perimeter rather than allowing it to chase freely through the centre.
When a bomb is killed, it stays where it died and leaves a large circular AoE at that position. This AoE persists for a meaningful duration and covers significant floor space. A bomb killed in the centre of the arena or near the stack marker position contaminates the most-used areas of the fight for the remainder of its duration. The correct approach is for the tethered player to maintain their kiting position at the edge of the arena, allow DPS to kill the bomb while it is out of the way, and ensure the detonation AoE falls against the wall rather than in traffic. With two bombs potentially active simultaneously, two players should be kiting to opposite sides so the detonations land on opposite edges and leave the centre open.
Outside the bomb phases, the fight is well-paced and manageable. The frontal cone is readable and the tank should simply reposition or orient the boss away from melee range during the cast. The stack marker requires the party to converge quickly on the marked player — this can conflict with bomb kiting if a tethered player is the marked target, in which case the rest of the party should stack on the tethered player’s perimeter position rather than pulling them back to the centre. Kenki Release is unavoidable partywide damage that healers should anticipate; it is not dangerous on its own but can be taxing after a bomb detonation if anyone clipped the AoE.
Failure Points
Bombs killed in the wrong location are the fight’s primary source of sustained inconvenience. A detonation AoE dropped in the centre of the arena forces every subsequent mechanic to route around it, which is especially disruptive when a second bomb is still active and also needs to be kited and killed cleanly. Tethered players who make no effort to control the detonation position — running freely through the arena or standing in place — will consistently place the AoEs in the worst possible locations. The kiting arc is not complicated, but it must be intentional.
A bomb that successfully binds its target during an active Kenki Release or stack marker sequence creates a compound situation the healer has to manage simultaneously. Binding is avoidable entirely by maintaining distance — a tethered player who keeps moving will not be caught. The fight does not demand aggressive movement or difficult positioning, only consistent awareness of the bomb’s proximity to the tether target.
Dojun-maru
Key Mechanics
- Column AoEs — Narrow line AoEs that stretch the full length of the arena. Move laterally to avoid the active columns.
- Clones — Dojun-maru summons copies of himself that begin casting heavy partywide damage. Kill all clones as quickly as possible before their casts complete.
- Electric Circle Marker — Marks each player with a circular AoE that detonates on them. Players must spread away from each other before the marker resolves to avoid overlapping damage.
- Tatami-gaeshi — A Blue Mage spell used by Dojun-maru. Follow the standard telegraph to avoid its effect.
Strategy Notes
Dojun-maru is a fight with a clear priority structure: when clones are present, kill them before anything else. The clones channel heavy partywide damage and if their cast completes the resulting hit is significant enough to cause real healing strain — multiple simultaneous clone completions can wipe an unprepared group. Everything else in the encounter is secondary to clone removal. The tank should maintain threat on the boss while ranged DPS and casters switch immediately to the clones when they spawn; melee can use gap-closers or step away briefly if clone positioning allows it. Speed matters here — do not finish an ability rotation on the boss when a clone is mid-cast.
The column AoEs that run from one end of the arena to the other are readable but demand prompt lateral movement. They are narrow enough that a single step sideways clears them cleanly, but the full-arena length means there is no safe distance at range — every player, regardless of position, needs to identify which columns are active and move out of their path. When columns and clones are active simultaneously, the priority remains the clones; navigate columns during movement toward the nearest clone rather than stopping to dodge first.
The electric circle marker requires each player to spread away from their neighbours before the detonation. The mechanic is visually clear and the timing is not especially tight, but players who are clustered around a clone when the markers appear will need to move quickly to avoid chaining the blasts. The most common overlap scenario is two players who converged on the same clone and failed to spread in time — build the habit of checking marker proximity while finishing the clone kill. Tatami-gaeshi follows its telegraph cleanly; respond to the AoE indicator as it appears.
Failure Points
Clone casts completing is the singular failure condition in this encounter. A single clone completing is recoverable if the healer responds quickly; multiple clones completing simultaneously in the late fight is typically a wipe. The clones do not have large health pools — they fall quickly to focused damage — but a group that continues attacking the boss rather than switching targets will find them completing with regularity. The switch must happen immediately, without waiting to see if someone else handles it first.
Electric circle markers overlapping during a busy phase — when columns are also active and the party is repositioning after a clone kill — cause the most deaths in the second half of the fight. Players who move toward each other during column dodges and then fail to spread again before the markers resolve will overlap the blasts. Keep spatial awareness of neighbouring players during every phase transition, not only when the markers first appear.
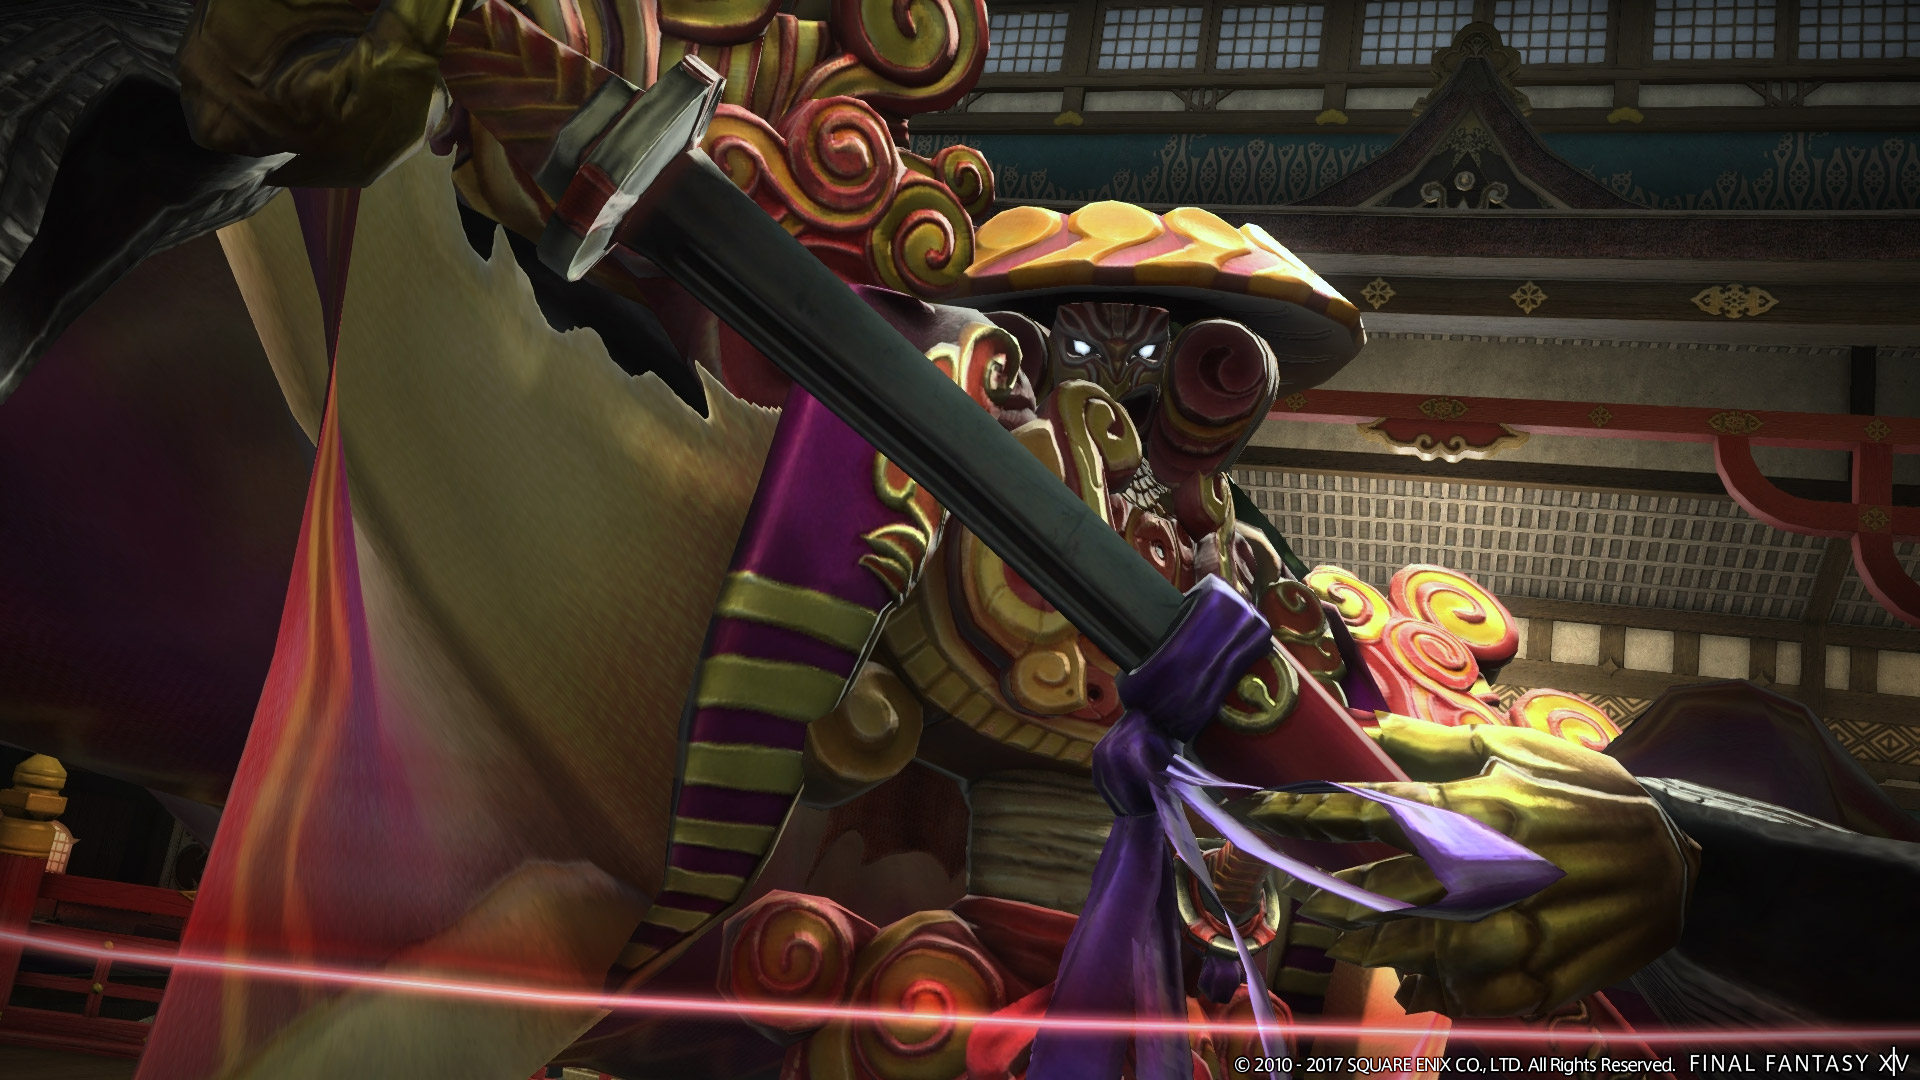
Yojimbo
Key Mechanics
- Metta-Giri — Occasional partywide AoE damage. Healers top up as needed.
- Inoshi-Katcho — First fires a large circle AoE in the centre of the arena, then fires a circle AoE covering the outer ring. Move to the outer edge to avoid the centre hit, then return to the interior before the outer ring fires.
- Self-Targeted Circle AoE — Yojimbo places a circular AoE on himself. Move away from the boss while this is active.
- Payday (First) — Gold piles spawn around the arena. Daigoro (Yojimbo’s dog) lunges toward gold piles in spawn order and picks them up, filling the duty gauge with each successful collection and knocking aside any player in his path. Every player must interact with as many gold piles as possible to claim them before Daigoro reaches them. When the phase ends, Yojimbo deals partywide damage scaled directly to how much of the duty gauge was filled — a higher gauge means a harder hit.
- Payday (Second) — Identical to the first Payday phase but with Dragon’s Head adds spawning during the gold collection. Each Dragon’s Head casts column AoEs targeted at player positions. Kill Dragon’s Heads quickly — they have low health — while continuing to collect gold. Dragon’s Heads may persist after the second Payday phase and should be killed when they appear.
Strategy Notes
Yojimbo is one of Stormblood’s most distinctive dungeon bosses because of the Payday phases, which replace the standard mechanical cadence with an active gold-collection race against Daigoro. Understanding how that system works before the pull converts a chaotic-looking phase into a clean group task; encountering it cold typically results in the party standing still and watching Daigoro fill the gauge while wondering what they are supposed to be doing.
Outside the Payday phases, Yojimbo’s rotation is approachable. Metta-Giri is unavoidable partywide damage that the healer should anticipate and top up through. Inoshi-Katcho fires in two sequential waves — first the centre of the arena, then the outer ring — which means the correct positioning is to move to the outer edge to avoid the centre blast, then step back inward before the outer ring fires. The window between the two blasts is readable and does not require rushing; move outward promptly when the centre indicator appears and move back in immediately after it resolves. The boss’s self-targeted circle AoE is a simple displacement — move away from Yojimbo when it fires and return to position after it clears.
When the first Payday phase begins, gold piles appear around the arena and Daigoro immediately starts moving toward them in the order they spawned. Every player should spread across the arena and interact with as many gold piles as possible — each pile a player picks up is one Daigoro cannot claim. Daigoro knocks aside players in his path as he lunges, which can cause displacement into active AoEs if the fight has any floor hazards active, so keep awareness of his trajectory. The duty gauge fills with each pile Daigoro successfully collects, and the partywide damage at the end of the phase scales directly to the gauge level. A party that collects aggressively will take a much lighter hit than one that clusters near the boss and ignores the gold. Spread out, cover the arena, and prioritise collection over damage uptime for the duration of the phase.
The second Payday phase adds Dragon’s Head adds to the gold collection. These have low health and die quickly, but their column AoEs targeted at player positions will accumulate if left unchecked. The priority split is straightforward: players near a Dragon’s Head should kill it immediately since a few hits are sufficient; players not near a Dragon’s Head should continue collecting gold. Do not abandon the collection race entirely to focus the adds — the gauge damage still applies at the end of the phase, and the Dragon’s Heads fall fast enough that a brief kill from the nearest player clears them without significantly impacting collection numbers. Dragon’s Heads may also appear after the second Payday phase completes; when they do, dispatch them promptly using the same approach.
Failure Points
A duty gauge that fills significantly during Payday is the most consistent source of avoidable damage in this encounter, and it is caused entirely by players not engaging with the gold collection. The phase is explicit in what it asks — pick up the gold before Daigoro does — and groups that treat it as a pause in the fight rather than an active mechanic will absorb a heavier partywide hit than necessary at the end of every Payday phase. This compounds across both phases. A party that performed poorly in the first Payday will enter the second with reduced health and face the same gauge-damage scaling again, now with Dragon’s Heads also active. Collect the gold every time.
Dragon’s Heads that are ignored during the second Payday phase generate column AoE accumulation that players navigating around gold piles will clip repeatedly. They have low enough health that even a single DPS can clear one in seconds without meaningfully impacting the overall gold count. The failure mode is not a lack of damage budget — it is players not noticing the add or deciding it is someone else’s problem. Any player in proximity to a Dragon’s Head should kill it without waiting for instruction.
Difficulty Assessment
Kugane Castle sits at a moderate difficulty level within Stormblood’s optional dungeon tier. None of its three encounters demand the mechanical breadth of Ala Mhigo or the multi-phase complexity of Bardam’s Mettle, but each boss has a distinct identity and at least one mechanic that is genuinely unusual for the level range. The dungeon’s tone — theatrical, inventive, occasionally surprising — is reflected in its design, and groups that engage with each encounter on its own terms will find Kugane Castle one of the more enjoyable dungeons in the expansion.
- Bomb kiting and detonation placement discipline during Zuiko-maru
- Clone kill priority and spread marker awareness under simultaneous column AoE pressure during Dojun-maru
- Active gold collection and duty gauge management across both Payday phases during Yojimbo
- Dragon’s Head add clearance without abandoning the collection race during the second Payday phase
Groups that understand the Payday mechanic before pulling Yojimbo will find the fight satisfying and well-paced. The gold collection race rewards active engagement, and a party that spreads across the arena and claims piles aggressively will take minimal damage from the phase resolution hit. Zuiko-maru and Dojun-maru both reward the fundamentals of spatial awareness and target priority that Stormblood’s dungeon tier has been building throughout — groups that have developed those habits will find neither encounter a meaningful obstacle.
Groups that encounter the Payday phases without context will consistently underperform them, not because the mechanic is difficult to execute once understood but because its structure is unlike anything else in the dungeon tier and the consequence of passive play — a heavy gauge-scaled damage hit — is not immediately legible as something the party caused. First-time groups often attribute the hit to a failed DPS check rather than a collection failure. A single sentence of explanation before the Yojimbo pull resolves this entirely. Dojun-maru will also punish groups that deprioritise clone kills, but the visual cue of casts completing is at least immediately obvious — the clone phase failure mode is slower to escalate and more recoverable than a fully-filled Payday gauge.
Previous Dungeon: Ala Mhigo | Next Dungeon: The Temple of the Fist
Guildmaster Notes
Kugane Castle presents itself as a monument to neutrality — a structure so perfectly composed, so precisely maintained, that politics are supposed to slide off its lacquered surfaces without finding purchase. The Joi understand this better than anyone. They did not occupy the castle by force. They occupied it by being exactly what the castle was designed to accommodate: the kind of power that looks, at the right angle, indistinguishable from ceremony.
Yojimbo is not a man who has forgotten his loyalty. He is a man whose loyalty was purchased, and who has decided that the purchase was legitimate. There is something almost admirable in the consistency of it — the refusal to dress the arrangement in anything nobler than it is. The Noh Theater was built for tragedy performed at a distance. Fighting in it makes the distance collapse. What remains is something smaller and stranger than legend, and truer for it.