Sohm Al Dungeon Guide (FFXIV Heavensward) – Boss Mechanics & Strategy
Duty Information
Expansion: Heavensward
Encounter: Sohm Al
Players: 4 Players (1 Tank, 1 Healer, 2 DPS)
Duty Finder Type: Dungeon
Level: 53
Unlock Requirement: Mourn in Passing
Common Failure Points
- Failing to kill Dravanian Hornets before they reach Raskovnik, stacking her damage buff.
- Standing near others during Myath’s blue blob Mad Dash, spreading the AoE marker.
- Ignoring the Chyme of the Mountain add and allowing The Last Song to complete its cast.
- Not moving to the arena edge for Comet markers, taking preventable proximity damage.
- Failing to destroy both of Tioman’s wings quickly enough during the invulnerability phase.


Dungeon Overview
Sohm Al is a level 53 dungeon introduced in patch 3.0 with Heavensward, set within a sacred mountain revered by the Dravanians. The dungeon winds through lush, overgrown terrain before ascending into draconic territory, culminating in a confrontation with one of the Elder Dragons’ own.
With the addition of Duty Support in patch 6.2, Sohm Al received balance adjustments making it accessible to solo players alongside Ysayle, Alphinaud, and Estinien.
Each boss fight introduces a distinct add management or positioning challenge. Raskovnik punishes players who ignore spawned enemies. Myath demands that the party read color-coded mechanics on the fly. Tioman adds a full phase transition that requires coordinated burst before resuming the main fight. Clean execution here comes from reading the room and responding to each mechanic’s unique demands rather than any single repeating pattern.
Need the unlock path? See All FFXIV Dungeon Unlock Requirements.
Duty Support
Sohm Al supports the Duty Support system introduced in patch 6.2. Players can enter the dungeon solo accompanied by the following NPC companions:
- Ysayle (Oracle of Frost) — Tank or DPS
- Alphinaud (Academician) — Healer or DPS
- Estinien (Dragoon) — DPS
Dungeon Objectives
- Defeat Raskovnik
- Defeat Myath
- Defeat Tioman
Boss Encounters
Raskovnik
Key Mechanics
- Acid Rain — Places small circle AoEs on all players simultaneously.
- Sweet Scent — Spawns Dravanian Hornets that deal no damage but slowly walk toward the boss. Kill them before they arrive.
- Draw-in + Flower Devour — Raskovnik marks a player, draws them in after a short delay, stuns them for 2 seconds, then unleashes a circular AoE. Any hornets caught within Devour’s range grant her a stacking damage increase.
- Spit — Room-wide AoE dealing moderate raidwide damage. Heal through it.
Strategy Notes
The fight revolves entirely around hornet control. Every time Sweet Scent fires, the party should immediately pivot to kill the spawned hornets before they reach Raskovnik. They move slowly, giving you a comfortable window — but that window closes fast if you ignore them.
When a player is marked for the draw-in, there is little they can do to avoid being pulled in and stunned. The rest of the party should focus on ensuring no hornets are alive near the boss when Flower Devour resolves. Even one hornet absorbed significantly increases incoming damage, and multiple stacks can turn the fight dangerous quickly.
Acid Rain is a simple spread mechanic — move apart before the circles land. Spit is unavoidable raidwide damage and just needs to be healed through.
Failure Points
Almost every wipe on this boss traces back to neglected hornets. Kill them the moment they spawn, keep the boss clear of stacks, and the fight resolves cleanly. Letting multiple Devour casts absorb hornets will quickly push the fight out of healable range.
Myath
Key Mechanics
- Razor Scales — Large cone AoE targeting a random party member. Move to the side to avoid.
- Primordial Roar — Raidwide damage that spawns four blob adds: two red (Blood of the Mountain) and two blue (Rheum of the Mountain).
- Mad Dash — Myath leaps onto a blob, then charges at a random player. The mechanic type is determined by the color of the blob used:
- Red blob: The targeted player receives a stack marker — party should group up on them.
- Blue blob: The targeted player receives a purple AoE telegraph and must stay away from the group.
- Chyme of the Mountain — On the second Primordial Roar, an additional large green blob spawns. It immediately begins casting The Last Song, a high-damage party-wide attack. Kill it before the cast completes.
Strategy Notes
Myath is a color-reading fight. Every Mad Dash requires a different response depending on which blob was leaped on, and reacting incorrectly — stacking when you should spread, or spreading when you should stack — results in avoidable damage or AoE overlap.
Watch Myath’s leap before each dash. Red blob means the targeted player needs the party stacked on them; blue blob means that player needs to move away from everyone else immediately. Establishing this read as a habit early makes the second phase much cleaner.
The second Primordial Roar introduces the Chyme of the Mountain. This is a hard priority target — switch to it the moment it appears and burn it down before The Last Song resolves. It does not need to be tanked; any party member can attack it freely. Do not finish the regular blobs first if the Chyme is casting.
Failure Points
The most common wipe scenarios are misreading red versus blue Mad Dash and failing to interrupt The Last Song by killing the Chyme in time. Both are recoverable with awareness — know which blob was used, and always treat the green add as the immediate priority.
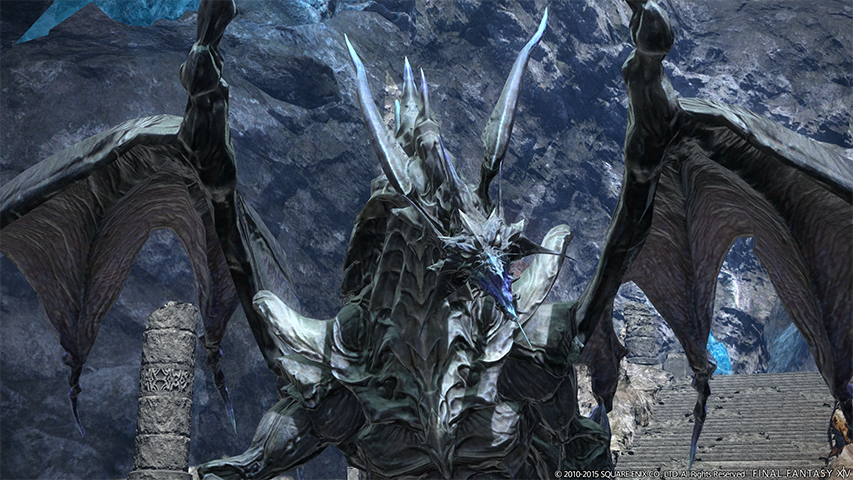
Tioman
Key Mechanics
- Abyssic Buster — Moderate-damage frontal cone. Tank should keep Tioman facing away from the party at all times.
- Chaos Blast — Places a multidirectional pattern of line AoEs at a random point in the room. Identify gaps and move into them.
- Comet — Spawns random circle AoEs around the room and marks two non-tank players with comet markers. After a short delay, the markers disappear and proximity AoEs appear at each marked player’s location. Marked players should move to the arena edge, then run back immediately after the marker disappears to minimize proximity damage. Later in the fight, all three non-tank players are marked simultaneously.
Wing Phase (50% HP)
At 50% HP, Tioman becomes invulnerable and her two wings become separate targetable enemies — Right Wing of Injury and Left Wing of Tragedy. Both must be destroyed to remove her invulnerability and resume the fight.
- Heavensfall — Repeatedly targets a random player with a weak unavoidable hit and a cluster of AoE circles at their location. Marked players should move away from the group and then dodge out of the circles as soon as they appear.
- Dark Star — Unavoidable raidwide damage. Heal through it.
Once both wings are destroyed, Tioman becomes vulnerable again and the original mechanics resume.
Strategy Notes
The pre-phase portion of this fight is a positioning discipline check. Abyssic Buster means the tank must maintain consistent boss facing throughout — establish a position early and hold it. Chaos Blast requires quick gap identification; scan the line pattern as soon as it appears and commit to a safe lane.
Comet is the fight’s most important individual mechanic. Marked players should walk to the arena edge as soon as the marker appears, then sprint back the moment it vanishes to reduce proximity damage. The goal is to be as far from the center as possible when the marker drops, then immediately close the gap. In the later version where all three non-tanks are marked, each marked player needs their own space on the edge — coordinate positioning so nobody overlaps.
During the wing phase, split damage between both wings and kill them close together if possible. Heavensfall fires continuously while the wings are alive, so movement discipline matters. Step away when targeted, dodge the circles, and stay on the wings. Allowing one wing to survive significantly longer than the other just prolongs the phase and increases total Heavensfall exposure.
Failure Points
Players most often struggle with Comet — either staying too close to center when the marker drops, or not moving back fast enough after it disappears. The wing phase can also drag if the party splits focus unevenly. Kill both wings efficiently and manage Heavensfall movement to bring Tioman back into the main phase cleanly.
Difficulty Assessment
Sohm Al is a mid-tier Heavensward dungeon that steps up mechanical complexity from The Dusk Vigil without becoming overwhelming. Each boss tests a different skill — add prioritization, color-based mechanic recognition, and phase transition management — making it a strong progression checkpoint for players moving through the expansion.
The dungeon emphasizes:
- Add kill priority and target switching
- Color-coded mechanic reading under pressure
- Comet edge-positioning and timing
- Sustained awareness across a mid-fight phase transition
Groups that communicate and react to each mechanic on its own terms will clear this dungeon with little friction. Those who treat all three bosses the same way and ignore the unique demands of each encounter will find themselves wiping to mechanics that are entirely readable with attention.
Previous Dungeon: The Dusk Vigil
Guildmaster Notes
Sohm Al is not a hostile place by nature. It is a sacred one — a mountain the Dravanians have kept since long before men had words for reverence. What waits inside is not simply an obstacle but a reflection of what it means to guard something so old that the guarding itself has become instinct.
Tioman does not fight out of cruelty. She fights because the mountain is hers to keep, and something in her has always known it. That conviction is what makes her dangerous — and what makes standing at the summit, in the stillness after, feel like something more than victory.