The Ghimlyt Dark Dungeon Guide (FFXIV Stormblood) – Boss Mechanics & Strategy
Duty Information
Expansion: Stormblood
Encounter: The Ghimlyt Dark
Players: 4 Players (1 Tank, 1 Healer, 2 DPS)
Duty Finder Type: Dungeon
Level: 70
Unlock Requirement: The Face of War
Common Failure Points
- Standing in the wrong half of the arena during Prometheus’s wall-launch blast and taking a sustained burn hit that lingers for several seconds after the initial impact.
- Failing to identify the safe spots at the arena edge during Annia’s Order to Bombard and being caught in the centre AoEs with nowhere to move.
- Allowing a detonated tank to chain into others during Julia’s Commence Air Strike sequence, turning a single Heirsbane hit into a cascading explosion.
- Being knocked back into melee range by Crossbones during Order to Bombard and taking the knockback damage on top of the active large AoEs.
- Failing to kill both sisters before Imperial Authority finishes casting after the second Crosshatch sequence, wiping the party despite both having been defeated once already.


Dungeon Overview
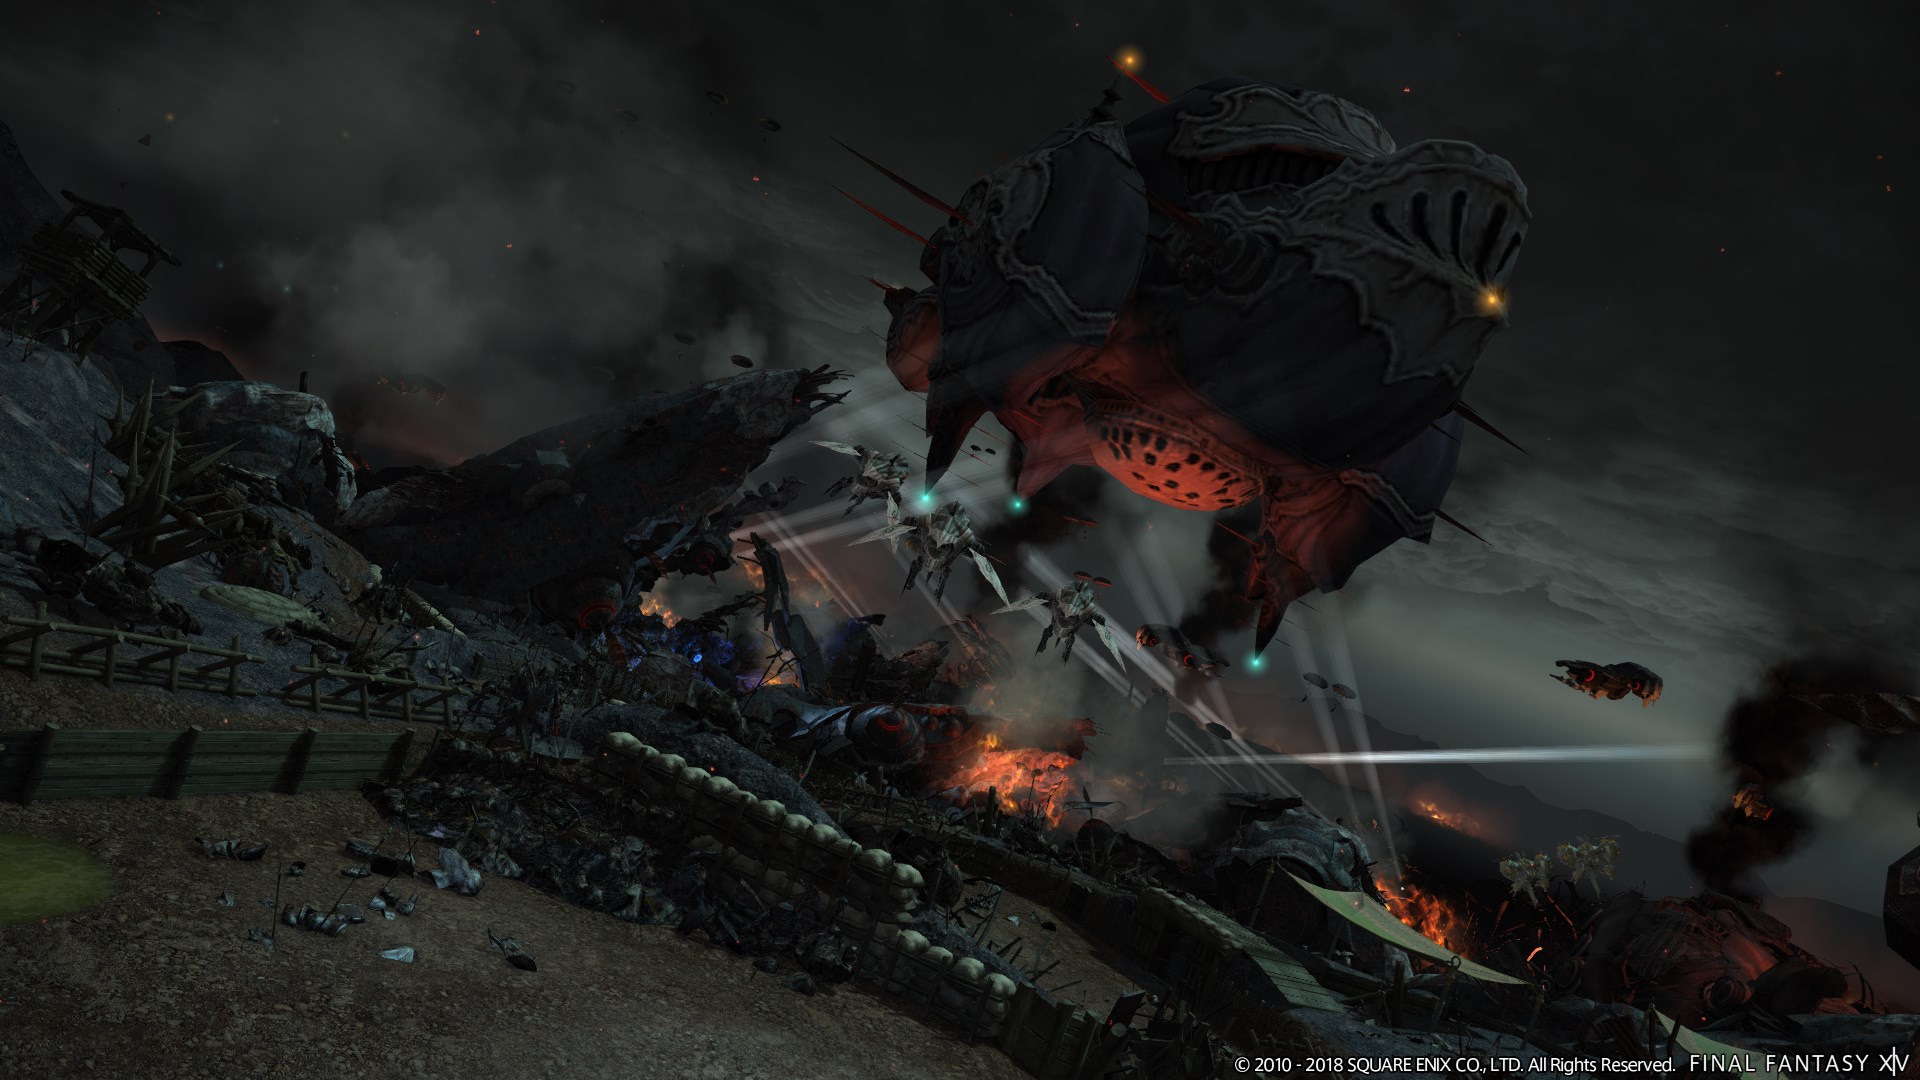
The Ghimlyt Dark is a level 70 dungeon introduced in Patch 4.5 with Stormblood, serving as the final dungeon of the expansion’s main scenario. It takes place on a battlefield at the border between Ala Mhigo and Garlemald’s sphere of influence — a dark, smoke-hazed no man’s land that provides an appropriately weighty setting for the expansion’s closing dungeon. The encounter design matches the narrative stakes, with each boss escalating in mechanical complexity toward a final fight that requires sustained coordination across an extended two-phase structure.
Mark III-B Magitek Colossus opens the run with a rotating fire puddle mechanic that progressively covers the arena, requiring the party to track the safe zone as the boss sweeps its sword through repeated arcs. Prometheus introduces a burrowing mechanic paired with directional wall blasts and a frontal/rear cone split that demands careful boss positioning. Annia quo Soranus and Julia quo Soranus close the dungeon as a paired boss encounter — the most mechanically complex fight in Stormblood’s main scenario dungeon series — requiring the party to manage two distinct ability sets simultaneously, survive a series of tag-out transitions, and then kill both revived sisters before a party-wipe Imperial Authority cast completes.
The Ghimlyt Dark is a fitting conclusion to Stormblood’s dungeon progression: mechanically ambitious, narratively charged, and demanding enough to distinguish itself from the tier’s earlier encounters. Groups that arrive here from Castrum Abania and Ala Mhigo will find the dual-boss structure familiar in concept but more complex in execution than anything that preceded it. Need the unlock path? See All FFXIV Dungeon Unlock Requirements.
Duty Support
- Hien — Samurai — Tank
- Doman Shaman — Shaman — Healer
- Alisaie — Red Mage — DPS
- Yugiri — Ninja — DPS
Dungeon Objectives
- Arrive on the Field of Dust
- Clear the Field of Dust
- Arrive at the Impact Crater
- Clear the Impact Crater
- Arrive at the Provisional Imperial Landing
- Defeat Julia and Annia
Boss Encounters
Mark III-B Magitek Colossus
Key Mechanics
- Jarring Blow — Tankbuster with a wide frontal arc. Non-tank players should not stand in front of the boss when this fires.
- Ceruleum Vent — Moderate partywide AoE damage. Healers top up as needed.
- Magitek Ray — Stack marker on a random player. The full party stacks to share the damage.
- Exhaust — Line AoE targeted at a random player. Move laterally to avoid the line.
- Wild Fire Beam — Simultaneous targeted AoE on each player. Spread apart to avoid overlapping damage.
- Magitek Slash — The Colossus slams its sword in a cone, leaving a fiery puddle that inflicts Burns while standing in it. The Colossus then rotates and repeats the slam, progressively covering the arena in puddles. The first puddle dissipates as the boss turns for its final strike, creating a brief safe zone there. Players must track the rotation and move into the dissipating puddle’s space to avoid being boxed in.
Strategy Notes
Mark III-B Magitek Colossus is a well-paced opening encounter that introduces the dungeon’s mechanical tone without overwhelming demands. The base rotation — Jarring Blow‘s frontal arc, Magitek Ray‘s stack, Exhaust‘s line, and Wild Fire Beam‘s spread — is readable and cleanly telegraphed throughout. Each requires only the appropriate movement response and does not interact with the others in ways that create simultaneous demands.
The encounter’s distinctive mechanic is Magitek Slash. The Colossus slams its sword in a cone AoE, leaving a fiery puddle at that location, then rotates and repeats. Each successive slam covers a new arc of the arena in Burns-inflicting puddles, and the pattern continues until the entire arena has been covered. The critical detail is that the first puddle — the one from the initial slam — dissipates as the Colossus turns for its final strike. This creates a brief opening in the puddle coverage that the party can move into to avoid the last slam. Tracking the rotation’s direction from the first slam allows the party to anticipate where the gap will open and position toward it before the final strike lands rather than scrambling after it appears.
The rotation proceeds in a consistent arc, so once the first slam direction is established, the party can track the sequence and identify the first puddle’s location for the final gap. Players who move too far ahead of the rotation — stepping into arena space before the puddle there has dissipated — will take Burns. Move toward the first puddle’s area progressively as the rotation approaches it rather than committing to the position early. The gap is brief but consistent across every Magitek Slash cast.
Failure Points
Being boxed in by Magitek Slash puddles is the fight’s primary avoidable outcome, and it happens most often when the party does not track the rotation direction from the first slam. A party that watches the first slam and identifies where the rotation is heading will always know where the temporary gap will open. A party that reacts to each slam individually rather than anticipating the sequence will find itself in progressively shrinking safe space with no clear sense of where to move next. The gap is predictable — treat Magitek Slash as a pattern to read from the first hit, not a series of individual dodges.
Wild Fire Beam spread failures during or immediately after a Magitek Slash sequence create compound positioning problems. Players who are already repositioning for the rotation when spread markers appear may cluster together rather than separating cleanly. When Wild Fire Beam and Magitek Slash overlap, treat the spread as the higher-priority movement requirement and find a direction that both avoids overlap damage and keeps the player away from active puddles.
Prometheus
Key Mechanics
- Nitrospin — Partywide AoE damage. Always the first cast of the fight; also surrounds the arena in fire. Heal through.
- Unbreakable Cermet Drill — Tankbuster. Apply mitigation and heal as needed.
- Needle Gun — 90-degree cone AoE directly in front of the boss. Move to the sides or rear.
- Oil Shower — 270-degree cone AoE directly behind and to the sides of the boss — covering everywhere Needle Gun does not. Move to stand directly in front of the boss.
- Wall Blast — Prometheus burrows underground. A section of the arena wall glows red. After a delay, a fiery blast launches from the red section across to the opposite wall, dealing damage and lingering for several seconds. Move to either side of the blast’s path before it fires. On the second use, Prometheus first casts Freezing Missile before burrowing.
- Freezing Missile — Four proximity AoEs strike simultaneously at each cardinal direction. Move away from the cardinal positions to reduce damage taken.
Strategy Notes
Prometheus is a fight defined by its opposing cone mechanic and punctuated by the burrowing wall blast. The core rotation alternates between Needle Gun and Oil Shower, which together cover nearly the entire arena — Needle Gun takes the 90-degree frontal arc and Oil Shower takes the remaining 270 degrees behind and to the sides. The safe zone for each is the exact opposite: stand directly in front of the boss for Oil Shower, and move to either side or behind the boss for Needle Gun. Both casts are clearly telegraphed, and the fundamental skill of this fight is maintaining awareness of which cone is active and being in the correct position before it fires rather than reacting to the indicator after it appears.
The tank should hold Prometheus in a stable central position and face the boss consistently — a stable facing direction makes the safe zones for both cones predictable and easy to identify from any position in the arena. Melee players can stand slightly to the boss’s flanks as a default position that gives them quick access to either the front or rear safe zones with minimal movement. Ranged players should stay toward the frontal safe zone as their default, as Oil Shower’s 270-degree coverage gives them the least margin if they are positioned behind the boss when it fires.
When Prometheus burrows and the wall glows red, move to either side of the arena perpendicular to the blast’s trajectory immediately. The blast fires across the full width of the arena and lingers — stepping back into its path after the initial impact will still deal damage for several seconds. Hold the side position until the fire dissipates before returning to the boss’s position. On the second burrowing phase, Freezing Missile fires first and places proximity AoEs at each cardinal direction — move away from the arena’s cardinal points before they resolve, then immediately check the wall for the glowing red section to reposition for the blast.
Failure Points
Oil Shower and Needle Gun confusion is the most consistent damage source in this fight. Players who are in a safe position for one cone and do not move for the other — either because they did not track which cast is active or because the transition between the two happened while they were repositioning for another mechanic — will take the full hit from the 270-degree arc. Oil Shower’s coverage is broad enough that any player behind or beside the boss will be caught; there is very little margin. The tank should call out the safe zone direction if the group is having difficulty tracking which cast is active.
The lingering wall blast catches players who return to the boss’s position before the fire fully disperses. The blast does not have a clean end point — the damage zone persists visually and continues hitting anyone in its path for several seconds after the initial launch. Players who move back toward the arena centre along the blast’s axis rather than perpendicular to it will take repeated ticks before realising they are still in the hazard zone. Move to the side and hold, not forward toward the boss, until the fire is visibly gone.
Annia quo Soranus and Julia quo Soranus
Key Mechanics
- Delta Trance — Annia’s tankbuster.
- Innocence — Julia’s tankbuster.
- Artificial Plasma — Moderate partywide AoE used by both sisters. Healers top up as needed.
- Commence Air Strike (Julia) — Eight Ceruleum tanks drop from the sky: four on the outer edge, four inside the arena. Julia may then use Roundhouse to kick tanks, dealing damage and knockback to players in melee range and repositioning the tanks. She then uses Heirsbane, targeting one tank with a crosshair that detonates it in a large area. Any other tank within the detonation radius also explodes, potentially triggering a chain. Players must avoid standing near tanks and ensure the Heirsbane-targeted tank cannot chain into others.
- Order to Bombard (Annia) — Three large AoEs cover most of the arena, leaving small safe spots at the arena’s edge. Simultaneously, Julia casts Crossbones — four X-shaped projectiles, each targeting a player and inflicting knockback on contact — while Annia casts Angry Salamander, a line AoE aimed at a random player. Players must reach the edge safe spots while absorbing knockback positioning from Crossbones.
- Crossbones (Julia) — Four X-shaped projectiles travel across the arena. When used during Order to Bombard, each unerringly targets a player and knocks them back. When used during The Order, Julia moves to the centre and fires four Crossbones in a cross pattern while ground AoEs appear beneath each player simultaneously.
- Heirsbane (Julia) — Marks a random player with a crosshair and deals moderate damage to them after a short delay.
- Angry Salamander (Annia) — Line AoE aimed at a random player. Move laterally to avoid.
- Stunning Sweep (Annia) — Annia jumps to a random player and deals damage in melee range. Move away from Annia’s landing position.
- The Order (Julia) — Julia moves to the centre, surrounds herself with four Crossbones projectiles, and fires them in a cross pattern while simultaneous ground AoEs appear beneath each player. Players must spread for the ground AoEs and avoid the cross-pattern projectiles.
- Crosshatch (both) — A transition mechanic. The two sisters launch Crossbones projectiles back and forth across the arena in patterns denoted by narrow lines. After the first sister’s defeat, Crosshatch plays once and the surviving sister tags out — the defeated sister returns. After the second sister’s defeat, Crosshatch plays again with the addition of Covering Fire, a spread AoE on each player. Once the second Crosshatch completes, both sisters regain 20% HP and begin casting Imperial Authority.
- Imperial Authority — A party-wipe cast begun simultaneously by both revived sisters at the arena centre. Both must be killed before either cast completes or the party wipes.
Strategy Notes
The dual-boss encounter with Annia and Julia is the most complex fight in Stormblood’s main scenario dungeon series, and it operates across an extended structure that the party must understand holistically rather than one mechanic at a time. The fight has three distinct stages — the first sister phase, the tag-out transition, and the Imperial Authority finale — and each requires a different approach. Understanding the full arc of the encounter before pulling is essential.
The opening phase begins when the party attacks one sister, which determines which remains in the arena. Annia fights in melee with fist weapons; Julia fights at range with her gunblade. Both share the Artificial Plasma partywide and their respective tankbusters — Delta Trance for Annia and Innocence for Julia — but their distinctive abilities require different party responses. Julia’s Commence Air Strike drops eight Ceruleum tanks across the arena and then targets one with Heirsbane to detonate it. The detonation radius is large and chains to nearby tanks — the party must position away from tank clusters and ensure the Heirsbane-targeted tank is isolated enough that its explosion cannot reach adjacent tanks. If Julia uses Roundhouse before Heirsbane, she kicks tanks around the arena and knocks back nearby players — move away from the tanks before Roundhouse fires to avoid both the knockback and displacement into a worse position for the detonation.
Annia’s Order to Bombard is the encounter’s most demanding single moment. Three large AoEs cover the majority of the arena’s interior, leaving only small safe gaps at the outer edge. Simultaneously, Julia fires four Crossbones X-projectiles, each targeting a player and inflicting knockback on contact, while Annia fires Angry Salamander, a line AoE at a random player. The party must reach the edge safe spots before the arena AoEs fire, avoid the Angry Salamander line, and account for the knockback from Crossbones — which will push players from the edge toward the interior AoEs if they are not already in a safe position. Move to the edge early, face inward to absorb the Crossbones knockback without being pushed further in, and step clear of the Angry Salamander line.
After the first sister is defeated, both perform Crosshatch — narrow lines across the arena marking Crossbones paths that fire back and forth between them. Navigate the gaps in the crossing lines and avoid the narrow corridors. After Crosshatch resolves, the tag-out occurs: the defeated sister returns and the fight continues with the other sister active. The second phase proceeds with the same abilities and introduces The Order, in which Julia positions centrally and fires Crossbones in a cross pattern while simultaneous ground AoEs appear under each player. The ground AoEs require a spread response; the cross-pattern Crossbones require the party to be positioned off the cardinal axes. Move to intercardinal positions and spread from there.
When the second sister falls, a second Crosshatch fires — this time with Covering Fire spread AoEs on each player active simultaneously. Navigate the narrow Crosshatch lines while spreading for personal AoEs. Once the second Crosshatch completes, both sisters revive at 20% HP and begin casting Imperial Authority at the arena centre. This is the fight’s final and most unforgiving check: both must die before either cast completes. Deploy all remaining offensive cooldowns and Limit Break immediately. The cast is not instant — there is time to kill both if the party’s damage is focused — but neither sister can be ignored while the other is burned. Split damage evenly between both and commit every available resource to ending the fight before the wipe cast finishes.
Failure Points
Imperial Authority wiping a party that has already defeated both sisters is the encounter’s most demoralising outcome, and it occurs when the party does not recognise that the revival and wipe cast are the fight’s final phase rather than a transition. Both sisters reviving at 20% HP looks like a reset, but it is not — it is a timed DPS check with a hard wipe condition. The moment the second Crosshatch ends, the party should be burning both sisters with everything available. Groups that pause to assess the situation or that attempt to kill one sister before switching to the other will find the cast completing before both are dead.
The Order to Bombard sequence kills players who arrive at the arena edge too late to absorb Crossbones correctly. The knockback from Crossbones pushes players inward — a player who reaches the edge precisely when Crossbones contacts them will be knocked back into the active arena AoEs. Move to the edge before Crossbones arrives so that the knockback pushes inward only a short distance within already-safe space, rather than back into the covered interior. Players who are still in the arena centre when Crossbones fires will take both the knockback and the arena AoE damage in immediate succession, and neither is a light hit.
Difficulty Assessment
The Ghimlyt Dark is the most mechanically demanding main scenario dungeon in Stormblood, and its final encounter is one of the most complex boss fights in the expansion’s dungeon tier. The first two encounters are well-paced and individually accessible, serving as mechanical preparation for the sustained dual-boss complexity that follows. The Annia and Julia encounter rewards the full breadth of skills the expansion’s dungeons have been building — arena positioning discipline, stack and spread execution, add and environmental hazard management, and coordinated DPS prioritisation — applied simultaneously across an extended multi-phase fight.
- Arena rotation tracking and gap timing during Mark III-B Magitek Colossus’s Magitek Slash phase
- Cone safe-zone discipline and wall blast positioning during Prometheus
- Order to Bombard edge positioning and Crossbones knockback management during the dual-boss encounter
- Commence Air Strike chain prevention and Imperial Authority simultaneous kill execution
Groups that understand the full arc of the Annia and Julia fight before pulling — specifically the Imperial Authority revival phase — will find the encounter a satisfying and challenging conclusion to Stormblood’s main scenario dungeon series. The Order to Bombard sequence rewards the edge-positioning instincts that the expansion’s earlier dungeons have been developing, and the tag-out structure gives the fight a narrative momentum that makes each phase transition feel purposeful. Groups that manage tank cooldowns cleanly across both tankbusters and keep Ceruleum tank chains from triggering during Air Strike will arrive at the Imperial Authority phase in good condition to execute the final kill.
Groups that do not understand the Imperial Authority revival will treat the second Crosshatch as a wind-down and emerge from it unprepared for the simultaneous wipe cast. This is the encounter’s single most consistent cause of late-fight party wipes, and it is entirely preventable with a single sentence of explanation: both sisters revive at 20% HP after the second Crosshatch, and both must die before their wipe cast completes. Everything that comes before it is preparation for that final thirty seconds.
Previous Dungeon: Saint Mocianne’s Arboretum (Hard)
Guildmaster Notes
The Ghimlyt Dark is not a place that was built. It is a place that happened — a stretch of ground where two forces arrived at the same time from opposite directions and the land became defined by the collision. Walking through it now, with smoke still in the air and the architecture of both sides visible in fragments along the route, is to walk through the physical form of an unresolved argument. Neither side is gone. Neither side has won. The darkness is not metaphorical.
Annia and Julia are the dungeon’s argument made personal. They are not enemies in the ordinary sense — they are an idea about what loyalty looks like when it is carried far enough and a reminder that the people on the other side of a conflict are not abstractions. The fight ends twice, and then it ends again, and the third ending is the only one that counts. There is something in that structure that the dungeon earns — the sense that some things do not resolve cleanly, that stopping something requires more than defeating it once, and that the dark between the front lines is where that truth lives most honestly.