Saint Mocianne’s Arboretum (Hard) Dungeon Guide (FFXIV Stormblood) – Boss Mechanics & Strategy
Duty Information
Expansion: Stormblood
Encounter: Saint Mocianne's Arboretum (Hard)
Players: 4 Players (1 Tank, 1 Healer, 2 DPS)
Duty Finder Type: Dungeon
Level: 70
Unlock Requirement: Secret of the Ooze
Common Failure Points
- Failing to position near the Rafflesia before Nullchu leaps to devour it, getting caught by the instant Odious Atmosphere breath in the centre of the arena.
- Not accounting for Lakhamu’s Landslip conveyor push direction, being shoved into the thorny arena wall or a Rockslide line and taking a Vulnerability Up stack.
- Allowing a Quagmire AoE to coat one of the four solid platforms during the Tokkapchi fight, creating a long-duration Vulnerability Up puddle in a required safe zone.
- Letting the Mud Slime be hit by arena attacks or the periodic grate eruption and grow twice, triggering an immediate high-damage Corrupture with a cleansable Damage Down debuff.
- Failing to push the Mud Slime out of Feculent Flood‘s cone path in time, allowing the slime to take a hit and grow during the fight’s most telegraphed growth opportunity.


Dungeon Overview
Saint Mocianne’s Arboretum (Hard) is a level 70 dungeon introduced in Patch 4.4 with Stormblood. It revisits the overgrown research facility from Heavensward at a later stage of ecological chaos, with each of its three encounters drawing on the arboretum’s theme of growth, decay, and biological systems that have outlasted their original purpose. The dungeon has no Duty Support and functions as an inventive mid-tier optional challenge with a final boss that stands among the more mechanically creative encounters in Stormblood’s patch dungeon lineup.
Nullchu opens the run with an encounter built around Rafflesia positioning — the party must track a spawning add and be near it when Nullchu devours it to avoid being caught by an instant, devastating breath attack. Lakhamu introduces an arena-wide conveyor mechanic that physically pushes the party across the floor, demanding that players pre-position to land in safe space rather than trying to dodge after being displaced. Tokkapchi closes the dungeon with the expansion’s most elaborate add-management puzzle: a Mud Slime that cannot be killed, only pushed, and that grows in power each time it is struck by an arena attack — requiring the party to manage every source of damage in the fight to keep the slime away from harm.
The Tokkapchi encounter in particular is one of Stormblood’s most original final boss designs. The Mud Slime’s growth mechanic inverts the usual approach to add management — the goal is not to damage it, but to protect it from damage while pushing it to safety — and groups encountering it without preparation will instinctively make the worst possible choices. A thorough briefing before the final pull pays dividends that no amount of recovery can compensate for. Need the unlock path? See All FFXIV Dungeon Unlock Requirements.
Dungeon Objectives
- Arrive in Zymology
- Clear Zymology
- Arrive in the Soil Bed
- Clear the Soil Bed
- Arrive in Kingsloam
- Defeat Tokkapchi
Boss Encounters
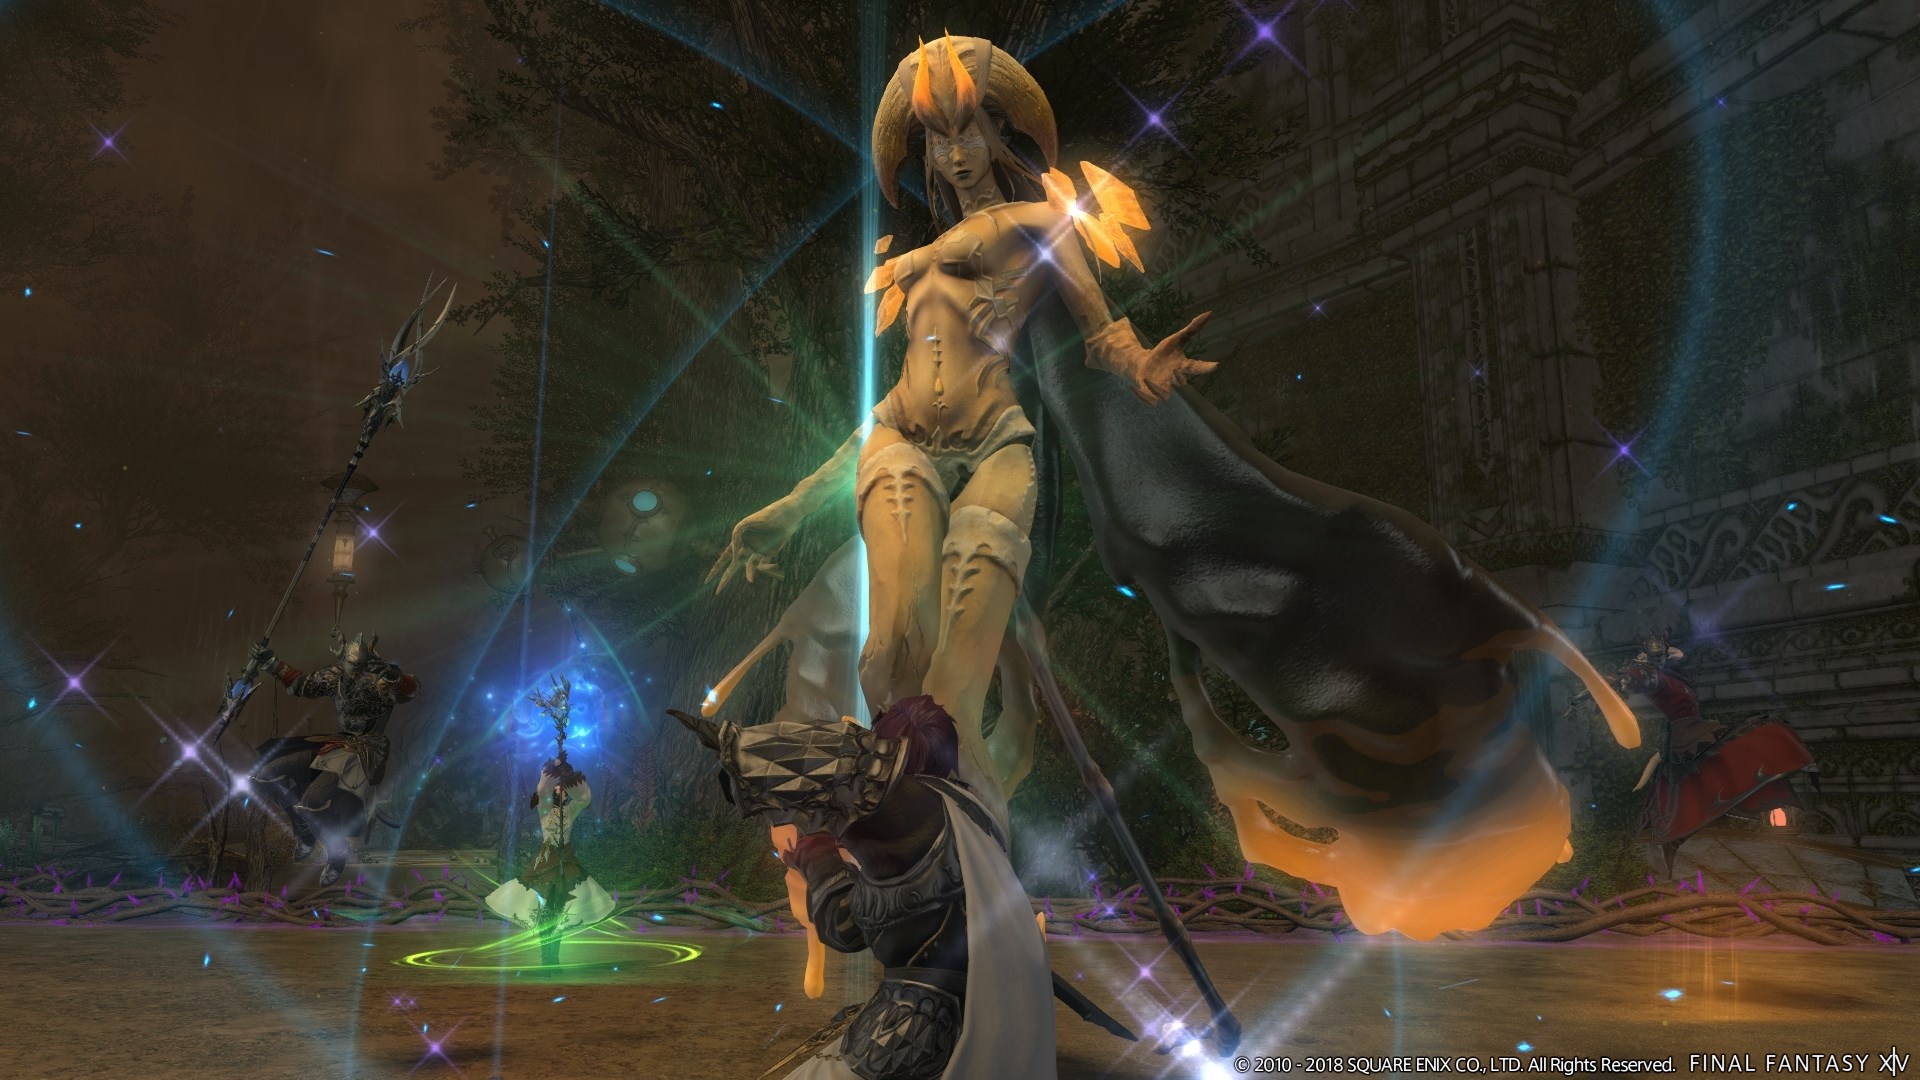
Nullchu
Key Mechanics
- Odious Air — Cone AoE that deals damage and inflicts Poison. Move out of the cone telegraph.
- Vine Whip — Tankbuster. Apply mitigation and heal through as needed.
- Sludge Bomb — Marks a player with a cross marker, then places a telegraphed AoE beneath them. When it detonates, a green pool spawns at that location. The pool inflicts Pollen (a poison effect) and Leaden while standing in it. The marked player should move to an edge or corner area before the AoE fires to drop the pool away from the party’s movement space.
- Fault Warren — Stack marker on a random player. The full party stacks to share the damage.
- Rafflesia (add) — A non-targetable Rafflesia spawns at the arena edge, announced by “The hall echoes with the twitching of roots and vines.” When Nullchu detects it, announced by “The Nullchu has found its next meal!”, the boss turns to face the Rafflesia and leaps to its position to cast Devour. After consuming the Rafflesia, Nullchu channels Odious Atmosphere, a persistent ground AoE covering a large portion of the arena that deals continuous damage and inflicts a 30-second cleansable Poison to anyone standing in it. The cast resolves extremely quickly. The safe zone is the area near where the Rafflesia was standing — players must be positioned there before the devour resolves.
- Taproot — Simultaneous AoE markers on all players. Spread apart to avoid overlap damage.
Strategy Notes
Nullchu’s fight is paced and readable for most of its duration, with a rotation of manageable AoEs interrupted by the Rafflesia devour sequence — which is the encounter’s defining moment and its primary failure point. Understanding how the devour resolves is the entire preparation requirement for this fight.
Between Rafflesia spawns, the fight’s demands are routine. Sludge Bomb places a green pool at the targeted player’s position — that player should move to an out-of-the-way edge area before the AoE fires to ensure the pool lands somewhere the party is unlikely to need. The Leaden and Pollen debuffs from the pool are significant enough to care about over multiple casts, and a pool placed in the arena’s centre will be walked through repeatedly as the fight continues. Fault Warren is a clean stack mechanic that the party converges on quickly. Taproot requires spread — step away from the nearest players and hold until the AoE markers resolve. Odious Air‘s cone is telegraphed clearly and requires only lateral movement to avoid.
The Rafflesia sequence is where the fight’s real attention is required. When the arena announcement fires, the party should immediately identify where the Rafflesia has spawned on the arena edge. When Nullchu turns toward it with the “found its next meal” notification, move to the Rafflesia’s location as quickly as possible — not to the arena edge generically, but specifically to the Rafflesia’s position. Nullchu leaps to that exact spot, consumes the add, then instantly channels Odious Atmosphere in all directions except where the Rafflesia was. The cast fires so quickly that there is no time to move after the devour resolves — the party must already be at the correct location when it happens. Any player caught away from the Rafflesia position when the channel begins will take continuous damage and a 30-second Poison for as long as it takes them to reach the safe zone.
The channel does eventually end, but groups should not remain in the Odious Atmosphere any longer than necessary. After the channel concludes and Nullchu returns to its standard rotation, the fight resets to its base pattern until the next Rafflesia spawn. Track the announcement carefully on each cycle and begin moving to the spawn point as soon as its location is identified.
Failure Points
Odious Atmosphere catching players in the wrong position is the encounter’s primary damage source, and it occurs almost exclusively when players do not identify the Rafflesia’s location before the devour begins. A party that scans the arena edge immediately on the spawn announcement and moves proactively — rather than waiting for the “found its next meal” notification to begin moving — will be at the correct position before the channel fires. Reacting to the notification rather than the spawn announcement is consistently too slow.
Sludge Bomb pools placed in central or high-traffic areas compound the fight’s difficulty across multiple casts. A pool in the path of the party’s movement toward the Rafflesia position is particularly disruptive — a player who clips it during the pre-devour repositioning takes Leaden at exactly the moment they need to reach the safe zone quickly. Drop pools deliberately at the arena edge and route movement toward the Rafflesia through clean floor space.
Lakhamu
Key Mechanics
- Stone II — Tankbuster. Apply mitigation and heal through as needed.
- Tectonics — Partywide AoE damage. Healers top up as needed.
- Thorny Arena Edge — The outer edge of the arena is lined with thorny vines throughout the fight. Contact deals damage and applies one stack of Vulnerability Up.
- Landslip — Four conveyor-belt line markers appear covering the arena, and several Silt Golem adds spawn outside the arena boundary. When the cast completes, all players are physically pushed in the direction of the arrows by approximately half the arena’s width. While players are being pushed, the Silt Golems cast Rockslide, firing line AoEs ahead of them. Players should pre-position so the push carries them to a safe landing area rather than into the thorny walls or a Rockslide line. There is very little time to dodge Rockslide after being pushed.
- Earthquake — Two sequential AoEs: first a melee-range circle, then an immediate outer ring. Move to melee range to avoid the ring, or move to far range after the inner circle resolves. Both components must be read and responded to in order.
- Earth Shaker — Marks both DPS players and fires line AoEs from the boss toward each of them. Marked players should separate and move to positions that direct the lines into empty space.
- Empty Gaze — Gaze attack that inflicts Hysteria. Look away from Lakhamu before the cast resolves.
Strategy Notes
Lakhamu’s fight is structured around a recurring tension between the thorny arena walls and the mechanics that threaten to push players into them. The thorns are not a dramatic hazard in isolation — a single contact is a Vulnerability Up stack, not an instant death — but they become progressively more dangerous as the fight accumulates other damage sources, and Landslip is specifically designed to test whether the party can pre-position cleanly enough to avoid them during the single moment when players have no control over their movement.
Between Landslip casts, the fight’s mechanics are individually manageable. Earthquake fires two sequential AoEs — a close-range circle followed immediately by an outer ring — that together cover the entire arena except the far edge. The correct response is to watch which fires first and move to avoid it, then immediately move for the second. Moving to melee range after the initial telegraph appears and holding is usually the cleanest response; moving to far range works only if the player is already positioned there and can react to the inner circle before the ring fires. Earth Shaker fires lines toward both DPS players — separate before the cast resolves to ensure the lines travel into different areas rather than overlapping. Empty Gaze inflicts Hysteria, which causes loss of movement control — turn away from Lakhamu immediately when the gaze cast appears and turn back the moment it resolves.
Landslip requires pre-emptive positioning rather than reactive dodging. When the conveyor markers appear, read the arrow directions and identify where the push will carry each player from their current position. The push covers roughly half the arena — a player standing in the centre will be carried to approximately the edge of the arena in the push direction. The Silt Golem Rockslide lines fire during the push and cannot be dodged after displacement begins; the only safe approach is to ensure the landing position does not intersect with any active Rockslide line, and to ensure the push does not carry a player into the thorny wall. Position on the side of each lane that lands in open floor rather than against the boundary, and identify Rockslide line positions before the conveyor cast completes rather than after the push begins.
Failure Points
Landslip into the thorny walls is the fight’s most consistent Vulnerability Up source, and it is caused entirely by players who have not read the push direction and landing position before the cast fires. The conveyor arrows are visible for the full cast duration before the push activates — that time should be used to identify the safe landing position, not to continue attacking the boss. A Vulnerability Up stack from the thorns followed immediately by a Rockslide line hit is a meaningful compounded debuff load at a point in the fight when Earthquake and Earth Shaker are also applying damage pressure.
Earthquake’s two-hit sequence is the mechanic most frequently misread by players who are not familiar with the specific order. The inner circle and outer ring fire sequentially but rapidly — players who move away from the inner circle without accounting for the ring, or who do not move at all and wait to see which fires, will take one of the two hits reliably. The correct response commits to a position before either fires: move to melee range and hold, accepting the possibility of taking the outer ring from a bad starting position as a recoverable error rather than a wipe condition.
Tokkapchi
Key Mechanics
- Mudsling — Tankbuster. Apply mitigation and heal through as needed.
- Arena Grate — The arena floor is a grate with four solid platforms. Periodically, announced by “The puddles begin to froth”, mud erupts upward through the grate, damaging and launching any player not standing on a solid platform. Players must be on a platform when this fires.
- Quagmire — All players are simultaneously marked with AoE indicators. Players must spread to avoid overlap damage while also ensuring no marker detonates on one of the four solid platforms. A platform coated by Quagmire becomes a highly-damaging puddle that inflicts a 50-second Vulnerability Up to anyone who steps on it.
- Mud Pie — Tokkapchi moves to the arena centre and creates a Mud Slime add. The Mud Slime cannot be killed — it can only be pushed via damage. The Mud Slime must be kept away from all area-of-effect attacks, including Tokkapchi’s own abilities and the periodic grate eruption. Each time the Mud Slime is struck by an attack, it grows. Growth stages: untouched (Corrupture hits only melee range at detonation); grown once (moderate partywide Corrupture); grown twice (immediate high-damage Corrupture with a cleansable Damage Down debuff). After approximately 45 seconds, the Mud Slime detonates as Corrupture regardless of size.
- Feculent Flood — A very long cast-time cone attack aimed directly at the Mud Slime’s current position. The party must deal enough damage to push the Mud Slime out of the cone’s path before the cast resolves. The Mud Slime’s pushback distance scales with damage dealt — hit it hard before the cone fires.
- Royal Flush — Melee-range circle AoE. Move away from the boss when this fires.
- Bog Bequest — Ring AoE that leaves melee range safe. If Tokkapchi is at the arena edge, the far side of the arena is also safe.
- Muddy Dorpokkur (adds, second Mud Pie only) — Two low-HP adds that spawn alongside the second Mud Slime. They function primarily as a distraction from the Mud Slime management. Kill them quickly but do not allow their death AoEs or surrounding attacks to hit the Mud Slime.
Strategy Notes
Tokkapchi is the most mechanically original encounter in the dungeon and one of the most inventive final bosses in Stormblood’s optional dungeon tier. Its central challenge — the Mud Slime — inverts the standard add management paradigm entirely. The Mud Slime cannot be killed, and dealing damage to it is not progress: it is punishment. Every time the Mud Slime is struck by any attack, it grows larger and its eventual Corrupture detonation deals more damage. The party’s job is to prevent the Mud Slime from being hit by anything while using damage to push it into safe positions — an objective that runs directly counter to every instinct the dungeon tier has been building.
The moment Mud Pie creates the Mud Slime, the party should immediately identify where it has spawned and begin pushing it away from the arena centre and away from the grate sections that will erupt. The Mud Slime moves in the direction it is hit from — damage pushes it away from the damage source. Position on the side of the Mud Slime opposite the direction of desired movement and attack to push it toward a grate section that is away from the boss’s upcoming AoE zones and away from the periodic eruption timing. The push is not instant and requires sustained pressure to move the slime a meaningful distance, so begin early rather than waiting for an incoming threat to motivate the repositioning.
The primary threat to the Mud Slime’s size is Feculent Flood. This very-long-cast cone is aimed directly at the Mud Slime’s current position, and the extended cast time is specifically provided to allow the party to push the Mud Slime out of its path before it fires. When Feculent Flood begins casting, everyone should switch to hitting the Mud Slime from the side that pushes it perpendicular to or away from the cone’s direction. The cast is long enough that a focused group will move the slime clear well before the cone resolves — do not wait until the cast bar is nearly full to start pushing.
The second most common growth source is the periodic grate eruption. When “The puddles begin to froth” is announced, players must be on a solid platform — but the Mud Slime is also vulnerable to the eruption and will grow if it is sitting on a grate section when the mud fires. Track the eruption timing and ensure the Mud Slime is pushed onto a solid platform before each eruption, or at minimum onto a grate section that the eruption will not reach. The eruption’s coverage is consistent between casts, so once the safe zones are identified they remain predictable throughout the fight.
Quagmire is the encounter’s most critical positioning exercise because it directly threatens the solid platforms. All four players spread simultaneously, but no AoE marker may detonate on a platform — both because it creates a Vulnerability Up puddle on a required safe zone and because the puddle could also hit the Mud Slime if the slime is near that platform. Spread outward toward the grate sections, not inward toward the platforms, and ensure the spread positions are far enough from the platform edges that the AoE radius does not clip them. During the second Mud Pie phase, the Muddy Dorpokkur adds appear and should be killed promptly — but their surrounding combat area must be managed to keep incidental AoEs away from the Mud Slime’s position.
Failure Points
A twice-grown Mud Slime is the fight’s most catastrophic failure state and the one most commonly caused by misunderstanding the core mechanic. Players who instinctively attack the Mud Slime without considering that damage causes growth, or who allow the grate eruption to hit it because they were focused on reaching a platform themselves, will find the Corrupture detonation far more dangerous than anticipated. The Damage Down debuff from a twice-grown Corrupture is cleansable, but the burst damage precedes it and a party in poor health from earlier mechanics may not survive the hit. Every player must understand before pulling that the Mud Slime’s growth is entirely caused by attacks reaching it, and that every piece of damage management in the fight serves the goal of keeping the slime unstruck.
Feculent Flood hits on an unpushed Mud Slime are the single most damaging growth event in any given pull and the most clearly preventable. The cast is extremely long — longer than almost any other cast in Stormblood’s dungeon tier — specifically because the party is expected to use the full duration to push the slime clear. A group that begins pushing immediately when the cast starts will clear the cone path comfortably. A group that continues attacking the boss during Feculent Flood and only switches to the slime when the cast bar is half full will find the slime still in the cone’s path when it resolves, and the resulting growth into the subsequent Corrupture detonation will be the defining moment of a difficult pull.
Difficulty Assessment
Saint Mocianne’s Arboretum (Hard) occupies a unique position in Stormblood’s patch dungeon lineup — its individual encounters are not the most mechanically punishing in the expansion, but the Tokkapchi fight introduces a conceptual inversion that makes it one of the most surprising and memorable final bosses in the tier. The Mud Slime management requires players to abandon the instincts that dungeon design has been reinforcing since level one and adopt a completely different goal structure for add management. Groups that understand this before the pull will find the encounter original and well-crafted; groups that do not will spend the fight creating the very failure conditions they are trying to avoid.
- Rafflesia location tracking and pre-devour positioning during Nullchu
- Landslip landing-zone pre-positioning and Rockslide avoidance under displacement during Lakhamu
- Mud Slime push management and growth prevention across all damage sources during Tokkapchi
- Quagmire spread discipline that protects both solid platforms and the Mud Slime simultaneously
Groups that brief the Mud Slime growth mechanic thoroughly before Tokkapchi — establishing that damage to the slime is failure, that Feculent Flood requires immediate slime-push focus, and that the grate eruption timing must be tracked for slime positioning — will find the encounter one of the more satisfying boss designs in Stormblood’s optional dungeon run. Nullchu and Lakhamu are both accessible encounters with well-telegraphed mechanics, and groups that handle the Rafflesia positioning correctly and respect Landslip’s pre-positioning requirement will arrive at Tokkapchi in good health and good form.
Groups that do not prepare for Tokkapchi will generate a twice-grown Mud Slime almost every attempt — the instinct to damage any add that appears is deeply ingrained, and the grate eruption hitting an unpushed slime requires arena awareness that is easy to deprioritise during a busy mechanics phase. Once the slime has grown twice and a high-damage Corrupture with Damage Down is incoming, recovery is possible but requires exceptional healer output at a moment when the party may also be managing Quagmire puddles on their platforms. This is a fight where a fifteen-second briefing produces a fundamentally cleaner run than any number of recovery attempts.
Previous Dungeon: The Burn | Next Dungeon: The Ghimlyt Dark
Guildmaster Notes
Saint Mocianne’s Arboretum was built to cultivate and to study — to take the wild logic of growing things and make it legible. What the hard version of this place demonstrates is that legibility was always the arboretum’s ambition, not its achievement. The things that live here now have had long enough to develop on their own terms, and their terms do not include being understood. Nullchu does not behave like a plant that has been observed and categorised. It behaves like something that was left alone long enough to stop caring about the distinction.
Tokkapchi is the arboretum’s argument with itself made physical. It does not want to destroy the Mud Slime — it wants to use it. Every ability in the fight is building toward a detonation that Tokkapchi is trying to maximise and the party is trying to minimise, which means the whole encounter is a negotiation about what the slime is allowed to become. There is something almost philosophical about it: the dungeon that was built to categorise living things ends with a boss whose central mechanic is deciding what kind of thing a particular creature will be when it finally stops growing.