Containment Bay S1T7 (Extreme) Guide – Sephirot Trial Mechanics FFXIV
Duty Information
Expansion: Heavensward
Encounter: Containment Bay S1T7
Players: 8 (Tank / Tank / Healer / Healer / DPS / DPS / DPS / DPS)
Duty Finder Type: Trial
Level: 60
Item Level: 205
Unlock Requirement: A Fiendish Likeness
Encounter Overview
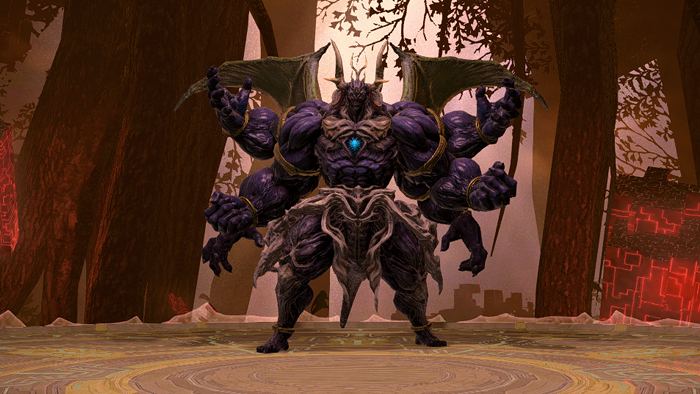
Containment Bay S1T7 (Extreme) is the high-end version of the Sephirot encounter introduced in Heavensward.
The fight is divided into three phases and heavily punishes individual mistakes, especially in the final phase
where several mechanics can wipe the entire raid if even one player mishandles their assignment.
The encounter begins with a grounded first phase focused on spread, stack, and positioning mechanics, transitions
into an add phase that functions as a damage check, and ends with a platform-edge phase built around debuff
matching, tether interceptions, tower soaks, knockbacks, and strict movement sequencing.
Arena Overview
During Phase 1, the outer edge of the arena is safe and players cannot fall off. In the final phase, Sephirot
moves off the platform, the walls disappear, and players can be knocked or pushed to their deaths.
Because the last phase combines knockbacks, tower assignments, debuff matching, and shrinking safe zones, clean
positioning and pre-assigned roles are essential to surviving the encounter.
Mechanic Archive
Triple Trial
A frontal cleave tankbuster used frequently in Phase 1. Sephirot should always be faced away from the rest of
the party when this attack is expected.
Tifferet
Raidwide damage used throughout the opening phase. It can appear in quick succession, creating repeated healing
pressure.
Ein Sof
Growing green circles that expand over time. Standing inside them deals damage and applies
Vulnerability Up. In the final phase, Ein Sof can also overlap with other movement mechanics and
restrict safe positioning.
Fiendish Rage
A healer and a DPS are marked with stack indicators and Sephirot leaps to each of them in sequence. The hits
apply Physical Vulnerability Up, so the two stacks must be resolved separately rather than on top
of each other.
Chesed
A heavy untelegraphed tankbuster indicated by Sephirot raising his arm. This is always followed by
Triple Trial, creating a strong burst-damage sequence on the tank.
Ain
Sephirot creates a single Ein Sof bubble and then turns toward a random player before releasing a massive
180-degree cleave. The safe response is to keep the party behind Sephirot and use the bubble placement to ensure
the cleave is aimed away from the safe half of the arena.
Ratzon
One player receives a large purple AoE while several others receive smaller green AoEs. The party must spread
carefully while remaining behind Sephirot to avoid overlapping damage and clipping the cleave from Ain.
Cochma
A large add during Phase 2. It uses physical attacks and applies Magic Vulnerability Up through
Empty Hand. Because of this, one tank generally handles Cochma while the other handles the Binah.
Binah
Smaller add groups that appear repeatedly during Phase 2. They cast Solid Stone on their main
enmity target, dealing heavy magic damage.
Genesis
An unavoidable raidwide burst triggered when adds die during Phase 2. Cochma deaths are far more dangerous than
Binah deaths, so the party must be prepared for large healing spikes during the add phase.
Ein Sof Ohr
A massive unavoidable raidwide attack cast after the Phase 2 adds are defeated, marking the transition into the
final phase.
Yesod
The ground flashes and then giant stalagmites erupt where players were standing when the flash appeared.
Players must move as a group after the snapshot to keep the eruptions controlled and avoid gaining
Damage Down.
Force Field
Four players receive Force Against Magic while the other four receive
Force Against Might. These debuffs determine which side of later mechanics each player must
resolve.
Gevurah & Chesed
Sephirot attacks half the arena with a green magic sphere and the other half with an orange physical sphere.
Players must stand with the half matching their assigned Force Field debuff.
Fiendish Wail
Two towers appear on the east and west sides of the arena. If left empty, the raid takes heavy damage and gains
Vulnerability Up. In some rotations only players with the correct debuff should soak these;
later in the phase tanks often handle them.
Da’at (Tethered)
Sephirot creates several Ein Sof circles and tethers four players. If handled properly, the tethers are
intercepted by the opposite debuff group so the outgoing damage resolves safely.
Da’at
When no Force Field debuffs are active, Da’at becomes a heavy AoE sequence on random players beginning with a
tank-focused hit.
Earth Shaker
A healer and a DPS are marked with long line tethers. Sephirot fires line AoEs through these players after they
reach safe distance. The tethered players must split to opposite sides and keep clear of the group.
Pillar of Mercy
Sephirot slams the platform on the north, west, and east sides in sequence. These impacts cause unresistable
knockbacks, so players must position themselves to be launched into safe areas rather than off the arena.
Malkuth
A strong knockback from Sephirot’s head. Players should move close to the boss to shorten the push distance.
This attack also begins the Storm of Words sequence.
Storm of Words
An add that appears on the south side of the platform and begins casting Revelation. If the cast
finishes, the party is knocked from the platform and wiped.
Revelation
The wipe cast from Storm of Words. This add must be defeated immediately.
Pillar of Severity
A sweeping platform-cleave used late in the rotation. If Storm of Words was defeated, its corpse creates a launch
point that the party must stack on to be thrown over Sephirot’s sweeping attack.
Encounter Flow
Phase 1 – 100% to 65%
The opening phase teaches Sephirot’s baseline mechanics. The party handles Triple Trial,
Tifferet, Ein Sof, Fiendish Rage, and the paired
Ain plus Ratzon sequence. Positioning around Sephirot matters throughout, since
the group must remain behind the boss while still spreading correctly for Ratzon and separating the two stack
markers from Fiendish Rage.
Phase 2 – Adds
At 65%, Sephirot becomes untargetable and the fight turns into an add-phase DPS check. Two
Cochma and several waves of Binah must be defeated before Sephirot’s limit
break finishes charging. Because Cochma applies Magic Vulnerability Up and Binah deal heavy magic damage, the
tanks usually split responsibilities between these enemy types.
Each add death triggers Genesis, so healer awareness is important throughout the phase. Once all
adds are dead, Sephirot casts Ein Sof Ohr to begin the final phase.
Phase 3 – Final Platform Phase
In the final phase Sephirot becomes much larger, moves off the platform, and removes the arena walls. From this
point forward, positioning errors can easily knock players to their deaths.
The phase begins with Yesod, then Force Field, and then
Gevurah & Chesed. These mechanics establish the core loop: players must know whether they are
Magic or Might, move to the correct half of the arena, and then resolve Fiendish Wail and
Da’at accordingly.
Later in the phase, Earth Shaker, additional Yesod patterns,
Pillar of Mercy, Malkuth, Storm of Words, and the final
Pillar of Severity sequence begin overlapping. The fight becomes a strict execution test where
the party repeats this rotation until Sephirot is defeated.