The Howling Eye (Extreme) Trial Guide
Duty Information
Expansion: A Realm Reborn
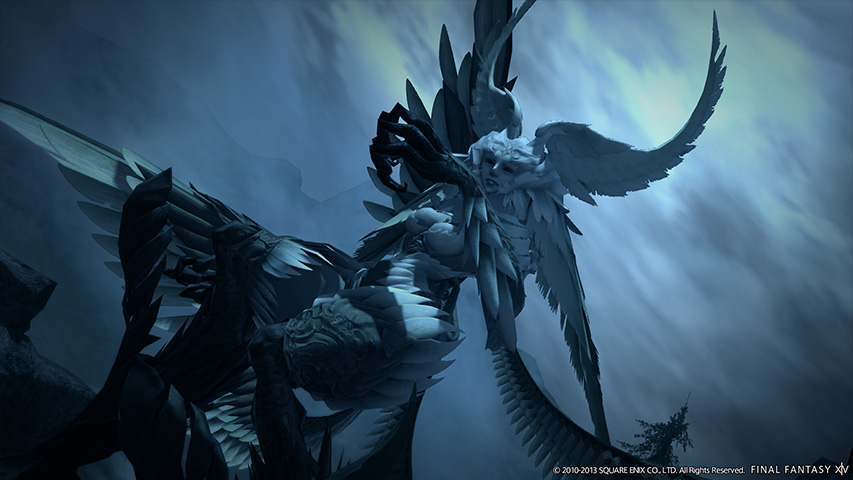
Encounter: Garuda (Extreme)
Players: 8 (Tank / Tank / Healer / Healer / DPS / DPS / DPS / DPS)
Duty Finder Type: Trial
Level: 50
Item Level: 65
Unlock Requirement: Complete Gale-force Warning
Encounter Overview
The Howling Eye (Extreme) is the Extreme version of the Garuda trial and serves as one of the earliest examples of a multi-phase primal encounter that tests add priority, line-of-sight positioning, and controlled handling of a special plume mechanic. While much of the fight resembles the lower-difficulty versions, Extreme introduces tighter add management and a wipe condition tied to the Spiny Plume.
The encounter is structured around repeated phase changes. Early phases focus on hiding behind stone pillars and controlling Garuda’s adds, while later phases revolve around preserving the Spiny Plume until the correct moment so its shield can block Garuda’s devastating return attack.
Arena Overview
The battle takes place in a circular arena with stone pillars during the earlier phases. These pillars are essential for line-of-sight protection against Garuda’s disappearance attacks. If too many pillars are destroyed before Reckoning, the party can be wiped by the incoming raidwide damage.
Later in the encounter, the pillars are destroyed and replaced by dangerous green whirlwinds, leaving only a handful of safe spots near the corners of the arena. At that point, the fight becomes more about positioning and timing than terrain abuse.
Mechanic Archive
Feather Rain
Random AoEs appear on the arena whenever Garuda disappears.
Strategy:
• keep moving while Garuda is off the field
• avoid standing still behind a pillar if an AoE appears under you
• once the AoEs resolve, reposition immediately for the next line-of-sight check.
Mistral Song
Garuda reappears between two pillars and fires a lethal line-of-sight attack.
Strategy:
• hide fully behind a stone pillar
• do not peek out too early, because the attack will kill exposed players
• this is one of the core rhythm checks in phase 1.
Razor Plumes
Small adds that must be cleared quickly. They return in later phases alongside the Spiny Plume.
Strategy:
• kill Razor Plumes quickly to reduce pressure and preserve control of the phase
• in later phases, clear only the Razor Plumes and leave the Spiny Plume alive until the correct timing window.
Satin Plume
A dangerous plume that will put the party to sleep if left alive.
Strategy:
• always kill the Satin Plume first when it appears
• do not let other plume targets distract the group, because a party-wide sleep often causes a wipe.
Chirada
One of Garuda’s two major adds.
Strategy:
• off-tank should pick up Chirada and keep it separated from Suparna
• most groups kill Chirada first to reduce pressure quickly
• keep its positioning stable so melee can stay efficient.
Suparna
Garuda’s second major add.
Strategy:
• main tank generally holds Suparna
• keep it separated from Chirada
• kill it after Chirada unless your group is using a different established order.
Reckoning
Garuda teleports to the center and unleashes unavoidable raidwide damage at the end of phase 2.
Strategy:
• stack in the center and heal through it
• preserving enough stone pillars before this cast is crucial, because too many destroyed pillars can turn this into a wipe.
Spiny Plume
A special plume that should not be killed immediately. It applies Thermal Low to the player at the top of its enmity list.
Strategy:
• do not kill the Spiny Plume while Garuda is still active in phases 3 and 4
• tanks must swap control of the plume at 2 stacks of Thermal Low
• if the active tank reaches 3 stacks, the party wipes.
Thermal Low
A stacking wind debuff applied by the Spiny Plume to the tank holding enmity on it.
Strategy:
• tank swap the plume at 2 stacks every time
• keep tank communication clear, because this mechanic is the core wipe condition of later phases.
Spiny Plume Shield
When the Spiny Plume is killed after Garuda disappears, it leaves behind a protective shield that blocks Garuda’s return attack.
Strategy:
• wait until Garuda vanishes, then kill the Spiny Plume immediately
• avoid the AoE when it dies
• stack inside the shield to survive Garuda’s return.
Green Whirlwinds
Large whirlwinds cover much of the arena in phase 4.
Strategy:
• use the safe spots in the northwest, northeast, southwest, or southeast
• do not drift through the whirlwinds while chasing adds
• choose stable positions first, then continue handling adds from there.
Encounter Flow
The encounter opens with a familiar Garuda phase, but the party must already respect two early priorities: avoid Feather Rain while Garuda is off the field, and use the stone pillars correctly to survive Mistral Song. When plumes appear, the Satin Plume becomes the highest kill priority because allowing it to cast its sleep effect often causes immediate collapse.
In phase 2, Garuda summons Chirada and Suparna. The tanks should separate them, with most groups killing Chirada first before finishing Suparna. The phase ends with Reckoning, which is healed through in the center and becomes much more dangerous if too many pillars have already been lost.
Phase 3 introduces the real Extreme-specific check: the Spiny Plume. The party clears Razor Plumes but keeps the Spiny alive while tanks swap it at 2 stacks of Thermal Low. Once Garuda disappears, the Spiny Plume is killed so its shield can protect the party from Garuda’s return attack.
Phase 4 combines the earlier add handling with dangerous green whirlwinds, reducing the usable arena to corner safe spots. The party again separates Chirada and Suparna, kills them in order, preserves the Spiny Plume until Garuda vanishes, and then hides inside the resulting shield. From there, the fight cycles between phase 3 and phase 4 patterns until Garuda dies.
At modern levels, the encounter can also be unsynced and overpowered, but in synced conditions the fight is still a strong early lesson in add priority, tank coordination, and delayed kill timing.